I'm certain you've already got a ride
in mind that you'd like to make. Get a piece of paper and WRITE DOWN
the following things about your idea. (I’m serious! Writing it
down helps you to focus...DO IT! DO IT NOW!!!):
- SIZE - Not the height, but
the footprint it will have. How many tiles it would cover.
- BUILD MODE - Is it a Flat
Ride or a Tracked Ride?
- MOVEMENT - Can you work
with one animation mode or will different modes be necessary?
(One mode is advisable for most Base Rides)
- SIMILARITIES - Are there
rides in the game that are even REMOTELY similar to what you're
planning?
- RIDERS - Would the Riders
NEED to be visible?
- CAPACITY - How many Riders
can ride your creation at a time?
Once you have those, you need to choose a ride whose programming
will serve as a "Base Ride" for your project. The previous
chapter includes a table listing all of the rides and car/train
types in RCT2. I've included all the pertinent information you'll
need to find one that fits your needs.
I’ve said it MANY times so far, and I’m sure I’ll say it
again. (Actually, I know that I will...I’m about to say it.)
Your design MUST BE FLEXIBLE. Many ride concepts simply WILL
NOT WORK within the bounds of RCT2. Since we cannot change the game’s
programming, WE must be what changes.
FLEXIBILITY
STUDY: "The SWINGER"
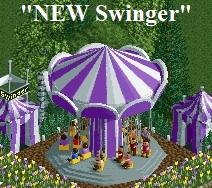 When
creating The Swinger, I completely 3D modeled the ride from
scratch...giving it 18 swings and Riders (9 sets of two swings each)
instead of the three dozen most real-life rides of it’s kind can
hold. Since we can't increase the ride capacity...the ride becomes
very unstable when you do...I had to bend my idea to fit what the
ride's programming would allow. FLEXIBLE!
When
creating The Swinger, I completely 3D modeled the ride from
scratch...giving it 18 swings and Riders (9 sets of two swings each)
instead of the three dozen most real-life rides of it’s kind can
hold. Since we can't increase the ride capacity...the ride becomes
very unstable when you do...I had to bend my idea to fit what the
ride's programming would allow. FLEXIBLE!
I also noticed that the Twist/Snow Cups (their programming is
identical) used 24 frames of animation to turn the ride
120-degrees...1/3 of a rotation.
Watch the ride carefully and you'll notice something else, the
riders use nine FULL rotations to return to the exact same point on
the ride. This meant that the Swinger riders would NOT go 1/3 of the
way around the ride in my 24 animation frames, but 4/9 or
160-degrees.
At the end of that 24 frames, the Rider is replaced by the one
that STARTS the animation in that position at the beginning of the
sequence...which is why the seats on RCT Flat Rides must all be the
same color. (If you look closely at the Swinger, you'll notice that
there are 18 stripes on the purple canopy...for exactly the same
reason.)
In the original SimRide (Scenery) version, the Swinger also moved
up and down...like the real life ride does. That kind of movement
would necessitate a second animation mode that kicks in after the
ride starts spinning. Because the programming of the Twist doesn't
support that kind of movement -- a single animation that merely
speeds up and slows down -- the upward movement had to be
sacrificed. Again, bowing to the limits of the game.
It WOULD be possible to create a Swinger that increased speed
(causing the swings to move outward) and then rose upward. The
programming of the Enterprise supports something similar to that.
BUT, the Enterprise does not show Riders...it's programming doesn't
allow that. The ride would have to be ALWAYS full or ALWAYS empty,
making it no better than the non-functioning SimRide version.
So, I had to make a few changes from my original idea...fewer
riders, seats not swinging outward, ride not rising upward, etc. But
if I HADN’T allowed these changes, the ride would never
have become a reality in the world of RCT2.
FLAT RIDE
MOVEMENT
Don’t be locked into what you see happening on the screen
during the game. The animation of any ride comes from what YOU give
it during the picture-drawing process. You may look at the Twist and
say, "Can’t use that one...it spins around. I want to make
something that bounces up and down." WRONG!
If you were to assemble a 24-frame animation of a ride going up
and down and plug it in to the Twist’s programming...your ride
would go up and down.
However, the Twist does NOT always stop in the same position
every time, so your ride MIGHT stop to load/unload Riders while the
thing is still up in the air! That’s something to consider.
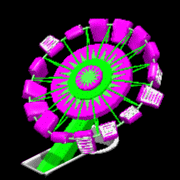
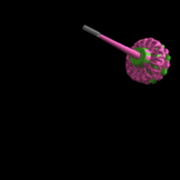 Another
example is my "Ripsaw." It’s based on the RCT2 Swinging
Ship which doesn’t spin...yet the Ripsaw does! I simply made it
turn in my animation sequence. The game doesn’t care...it’s just
displaying the pictures.
Another
example is my "Ripsaw." It’s based on the RCT2 Swinging
Ship which doesn’t spin...yet the Ripsaw does! I simply made it
turn in my animation sequence. The game doesn’t care...it’s just
displaying the pictures.
You’ll notice that the ride doesn’t spin completely around
(as I’d hoped). The Swinging Ship uses it’s animation frames
both forward AND backward, so there was no way to accomplish that in
RCT2.
 One
final example is the "Chaotic" which uses the RCT2
Enterprise as a base. The cars/pods flip around in the Chaotic, but
DON’T on the Enterprise. I simply added that to my animation.
One
final example is the "Chaotic" which uses the RCT2
Enterprise as a base. The cars/pods flip around in the Chaotic, but
DON’T on the Enterprise. I simply added that to my animation.
One other thing about movement...SPEED! Certain rides move faster
than others. There’s really no way to really slow them down or
speed them up.
However with that being said, you MAY be able to alter it
SLIGHTLY via your artwork.
Say a ride uses 16 frames of animation per revolution (most rides
spin). By making it spin only HALF that distance in those 16 frames,
the ride would appear to move more slowly. Likewise, making the
animation into only eight frames (and duplicating them to complete
the cycle), it would spin twice as fast.
It’s very limited...but possible depending on the ride.
FLAT RIDE
LOADING AND UNLOADING
Most flat rides load and unload completely when they stop. If
that’s what YOUR ride would do, that’s wonderful. If you want to
stop on individual cars and load incrementally, there’s only one
option in the game...the Ferris Wheel.
I’ve had many requests over the years for a "Zipper"
or "Double Ferris Wheel." The ONLY ride to support their
incremental loading patterns is the Ferris Wheel. So far, so
good...Ferris Wheel as a Base Ride.
However, the Ferris wheel has only a FEW frames of animation (8,
I think). Since the movement of each ride requires them to turn
completely around, that would make the ride turn incredibly
fast...ruining the illusion of reality we’re trying to create.
There’s no way to slow it down enough with that small number of
animation frames to make it believable. That’s why I’ve never
made one.
Some things in RCT2 just aren’t possible.
HARD CODED RIDE
ELEMENTS
Sometimes you'll find that a ride already moves and loads like
you need it to. That's great! Although there may still be hard coded
elements in the way.
Not ALL of the artwork is included in the ride's .dat file;
entrance/exit buildings, station platforms, splashes on water rides
and even the support structures are generally not changeable.
Hardcoded items are listed in each ride’s entry in the previous
chapter.
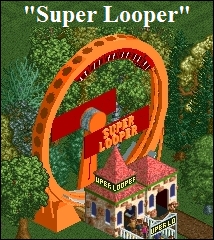 When
I created the "Super Looper," I found that the Swinging
Inverter Ship moved just like I needed it to. It didn't have any
programming to show Riders, but for my design, it didn't have to.
When
I created the "Super Looper," I found that the Swinging
Inverter Ship moved just like I needed it to. It didn't have any
programming to show Riders, but for my design, it didn't have to.
The problem is, the rear support for the Inverter Ship is hard
coded and NON-removable. Since that was the ONLY ride available that
moved in that fashion, all I could do is attempt to work it into the
design as best I could. (Making it look like it was holding up a
ride sign helped...but I still HATE that it's there!) Hard-coded
elements are also something that you will need to take into account
when choosing a ride to use as a base.
Sound effects can also be hardcoded into a ride...can’t be
changed or turned off. If they are there, you’re stuck with ’em.
CLEARANCE
One other thing to think about is the clearance of the Ride
you're making. (NOTE: If you don't know what "clearance"
means then you've never made any scenery for RCT. Rides should NOT
be your first project! Go make some scenery and come back when
you're comfortable with that.)
If you've created a piece of scenery, static or animated, and
exceeded the clearance limits, you've seen what happens inside the
game...the top vanishes or "strobes" when something passes
near it, etc. The same thing will happen to your ride if you make it
too much higher than the original Base Ride.
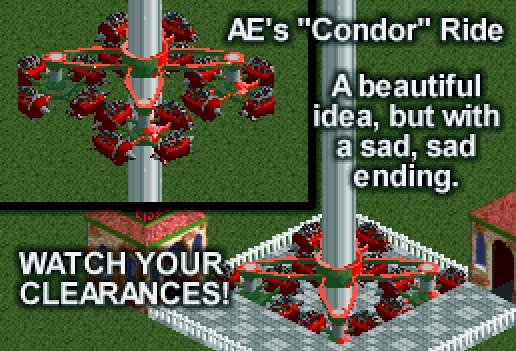
For example, I once attempted to make a rocket-themed Huss
"Condor" ride based on the RCT2 Double-Deck Observation
Tower. The ride was modeled, fully animated and looked AWESOME!
But when I finally got to the testing phase, I found that the
clearances simply wouldn’t allow for a ride vehicle that big. As
you can guess from the image, it was a sad, sad day.
It's devastating to work long and hard on a ride only to find
that it gets cut off at the top or sides...so plan in advance and
you'll save yourself from banging your head against your monitor
later on.
FOOTPRINTS
The number of tiles a ride covers cannot be changed. If a base
ride uses a 4 x 4 tile area (it’s "footprint"), then you
can’t make it use 5 x 5 or 2 x 6. There are certain rides that I’ve
not been able to make simply because they required too much space.
If you try to extend your artwork past the horizontal boundaries
prescribed by the ride’s programming, stuff will simply get cut
off and disappear. You can’t go beyond the brown tiles.
You CAN make a ride smaller...a kiddie ride for example. Nothing
says that you MUST completely fill the Base Ride’s footprint.
However if you use a base ride that requires 3 x 3 tiles, it will
STILL require 3 x 3 tiles in the game...the brown tiles will fill in
automatically.
Now, keeping ALL that stuff in mind...let’s get to work on your
ride. If you allow your idea to remain pliable, you just may find a
way to make it work...