|
~ How to Dissect a Ride
~ Inside the "Snow Cups"
~ |
Be forewarned, Buggy and I learned (the HARD way) that making your "dream ride" in RCT may be impossible. The underlying programming cannot be changed without crashing the game. The ONLY thing we can do is re-skin the ride...change the artwork. That’s it. End of story. We choose an existing ride in RCT2 to use as a base (our "Base Ride"), rip it apart, insert our own artwork and animations, then re-assemble the thing and hope for the best.
Certain things about the rides are "hardcoded," meaning that they cannot be changed. The hardcoded information may be incorporated into the programming of:
The individual ride's .dat file - the file that contains individual ride information and artwork
The g1.dat file - a huge file where the graphics for many of the game's elements (tracks, supports, etc.) are stored
The game's main .exe file - rct2.exe program, which runs the game itself
Life WOULD be so much easier if these things could be altered, but wishing ain't gonna make it happen.
Keep in mind that many things in RCT are simply not possible. Sadly, your dream ride may never become a reality...but with a little creativity, you might come close.
The best thing to do is keep your ideas flexible and change them to fit the game's requirements.
Let's rip open an RCT2 Ride and look at it’s guts.
For safety's sake, create a folder on your computer JUST for your RCT RideMaking projects...we'll call it "RideFolder." Create a subfolder inside that one called "cups." Then navigate to:
c:\ProgramFiles\InfogramesInteractive\RollerCoasterTycoon2\ObjData
-- or if you are playing the "Triple Thrill Pack", the folder --
c:\Program Files\Atari\RollerCoaster Tycoon 2 Triple Thrill Pack\ObjData\
Locate the file twist2.dat. Copy it to your clipboard and paste a copy into your "cups" folder.
Fire up Buggy's RideMaker and click the "SET" button. Go to your "cups" folder and double-click on the twist2.dat file. This tells the program where to put everything it’s going to generate.
Click the "LOAD" button and again, go to the "cups" folder and double-click on the twist2.dat file. This tells it what .dat file you want to rip apart.
Click "Disassemble," and when finished (could take a few seconds), click "OK."
Click "Extract Bitmaps," and when finished (could take even longer), click "OK."
NOTE: When using Buggy's RideMaker, some processes...especially extracting bitmaps...can take a while, up to a minute or more in the case of some rollercoasters and tracked rides. During this time, you may think that your PC has stopped responding or locked up, but DON'T INTERRUPT THE PROCESS! Just be patient and watch the little hard drive light blink on your computer. Everything will be fine.
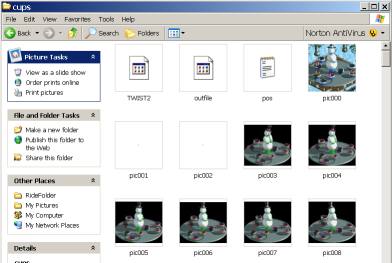
Close the RideMaker...it's a distraction...and open your "cups" folder. It's now FULL of stuff! Snow Cup Ride Guts! If using Windows XP, click view/thumbnails to make things easier to comprehend.
Let's identify the "organs":
twist2.dat - The original ride's .dat file...containing a compressed version of everything you see here.
outfile.bin - Nothing you need to concern yourself with...DON'T DELETE IT!
pos.txt - We'll get to that in a minute
A whole BUNCH of .bmp files - All 243 images necessary to create the Snow Cups ride in the game
Let's look at the pretty pictures now:
pic000.bmp - Look familiar? It's the image you see in the Ride Selection window in the game. The fancy little scalloped edges are added during game-play as needed.
pic001 & 002.bmp - Tiny little one-pixel .bmp images...dark green, for some reason. I personally have no idea what they're used for, but the game does! Don't mess with them or RCT2 will slap your fingers. You've been warned.
pic003-026.bmp - The 24 animation frames that make the ride go round and round. You'll notice that they're not all exactly the same size. We'll get to that in a minute. Try selecting all 24 of them in Windows, then right-click on one and select "Preview." Press your keyboard's Right Arrow key and you'll see a repeating slideshow that displays the animation sequence. Kinda cool.
pic027-242.bmp - The 216 images that show the happy, little riders going round and round. Doing the slideshow trick doesn't show much...just pairs of riders spinning and occasionally disappearing.
Why 216? (9 cars full of RCT Riders) x (24 ride animation frames) = 216 images needed to show the riders.
You'll notice that they're not all the same size either. Let's explain this mystery now.
When the game opens a ride, it uses 2D Geometry to figure out where to place the ride. On the X,Y plane of the screen, 0,0 is the center of the base of the ride...the exact middle of the brown dirt-looking tiles that appear when you build it. All the images are placed individually.
They're each offset by a particular number on the X and Y axis. Open the pos.txt file. How many images did we have total INCLUDING pic000.bmp? 243. You'll find 243 sets of numbers -- X,Y coordinates actually -- nestled in the pos.txt file.
To keep the size of the file small, every RCT2 image is cropped as closely as possible. To make sure that they all get put in the right position...every little rider in the correct seat...the game consults the proper line in the pos.txt file and adjusts the image’s placement accordingly.
I use a little shortcut to avoid a MASSIVE amount of figuring and testing for the pos.txt...but we’ll cover that in Chapter 8 when we get there.
The riders board this ride in pairs, so the rider images show both Riders...one in a pink shirt and one in green. During the game, the pink or green are replaced with whatever color that park guest happens to be wearing.
Next time you play the game, look carefully. If the guests ride a certain ride in pairs, only their shirts will change color...their pants will all be brown. When they get off the ride, their pants become their original color again. Never noticed that before, did you?
By the way, the Snow Cups spins, but doesn’t rotate.
(What did he say?)
There is only one view of the Snow Cups. Because it would really look the same from any angle, it doesn’t rotate with the game map when you’re playing. The game doesn’t discern between looking at it from the South and looking from the North...it’s always the same animation sequence.
So, what have we learned?
- The game draws the ride itself separately from the riders
- Some flat rides have only one view
- Pink and green are color-changeable during the game
- Some rides will make the guests have to change their pants
Intrigued? Cool! Let’s try another one. Make another subfolder in your RideFolder...let’s call this one "saucers." Go back to your RCT2 installation, find the file fsauc.dat and put a copy of it into your new "saucers" folder.
Re-open Buggy’s RideMaker and rip the fsauc.dat apart...SET button first, LOAD button next, DISASSEMBLE and EXTRACT BITMAPS. Now look inside your "saucers" folder...
FLYING SAUCER RIDE GUTS!
You’ll see some file names you recognize from the our previous exercise and by now, should understand what some of them are.
Notice that there are 32 pictures of the ride’s car...the saucer. Do the slideshow trick and you’ll see that it simply spins around. Those 32 animation frames make it...well...spin around. Since the ride’s car moves randomly in any direction, it needs all those pictures to show the ride.
How far does the saucer turn from one image to the other? (WOW! MORE Math...)
(360 degrees in a full circle) / (32 animation frames) = 11.25 degrees
That becomes important when you’re doing the animation later.
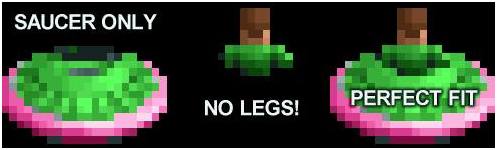
Notice the color of the saucer, too...pink and green like the rider’s shirts earlier. Those two colors will become paintable in the game.
You’ll also find 32 images of the rider...rotating the same number of degrees from image to image. You’ll also notice that sometimes you can’t see his legs! RCT cut his legs off!
Not really. But the Ride image is always put onto the screen first...the Rider is layered on afterward. The parts of the Rider that don’t show when he’s sitting in the vehicle are simply not there...otherwise he’d appear to be "ON" the vehicle, not "IN" it.
One thing that you DON’T see in those images is the weird hoverboard base that the saucers float on in the game. Remember the hardcoded (UNCHANGEABLE) items we discussed earlier? That’s one of them. Those images -- like ALL of the tracks in RCT2 -- are contained in the g1.dat file...which we can’t edit. Too bad. So sad. Have a nice day.
So, what have we learned from this one?
- Paintable parts of rides are also colored pink and green
- Rider images are usually incomplete because they’d overlap the ride image
- Some things just can’t be changed.
Okay...can you stand one more?
Make another subfolder in your RideFolder and name it "racer." Go back to your RCT installation’s objData folder, find rcr.dat, and put a copy of it into your new folder. Open Buggy’s RideMaker and rip that .dat file apart like the others. Then peek into the "racer" folder
WOW! LOTS of guts in that one.
If this were a classroom, I’d ask you to identify what each file is...but I guess I’ll just have to trust you on this one.
Okay, we have 104 images of the car. WHY SO MANY?! Do the slideshow trick to see what we’re doing and I’ll break them down:
The first 32 frames are of the car on a flat surface...a 32-frame rotating animation. (11.25 degrees, right? Yeah...you knew that.) This allows the vehicle to appear to turn smoothly on curved sections of track.
The next four are of the car facing the four corners - NorthEast, SouthEast, SouthWest and NorthWest. You’ll also notice that the car is tilted upward JUST slightly...about 11.25 degrees from level. These images are used when the vehicle is JUST starting to go up an incline.
The next four are exactly the same, but with the car tipped DOWN 11.25 degrees. That’s for when it comes OFF a slope.
Why don’t we need 32 images there? Because in RCT2, there are only four directions in which you can build an inclined track for this ride...that’s why, smart guy.
The next 32 images are another 32-frame rotation...and the car is tipped upward just a bit more...to about 22.5 degrees. That’s half of a 45-degree angle...and the same slope as the steepest track available on this ride.
The next 32 images are identical to the previous ones, but with the car pointed DOWN 22.5 degrees...for just the reasons you’d figure.
Why don’t we need only 4 images, since slopes can only go in 4 different directions? Because...because...well, I don’t KNOW why we need all those images. I’m not really convinced that the game uses them all. I believe that in some of my own tracked ride projects, I left them blank and nobody noticed. Maybe they get used during vehicle crashes, but I can’t be sure. They are there because...well...Chris Sawyer says so, okay?
Next, the rider images...a cute little guy in a green shirt (as you’d expect), with 104 frames (just as you’d expect) rotated in exactly the same positions as the car images (just as you’d expect)...with his little legs cut off (just as...never mind).
What you might NOT expect is the images that come next...pic211-242.bmp. They’re single-pixel and ALL BLACK! Think of them as 32 blank frames of animation.
Why are they there? I don’t know.
Are they important? Possibly.
Can you delete them? Absolutely not.
I suspect that they’re an artifact left over from when the game was still being developed...a different animation method was used, perhaps...or these might have been an abandoned loading sequence (which are usually placed at the end).
They’re there because they’re there. Who knows? Chris Sawyer does, but he’s not talking.
So, what have we learned?
- Rides with hills on their tracks have MANY more images than those without
- Sometimes in RCT2, things just are what they are and make no sense.
- You ignore that silliness at your peril.
From here we could go on to opening various flat rides and coasters, but we won’t. Feel free to explore them on your own and study their similarities and differences.
You should notice that Flat rides all have the same basic format...with certain little anomalies here and there. Coasters all have the same format as well, but with extra features for each one.
For instance, certain coasters CAN do diagonal sections of track, so they have EIGHT slightly sloped images instead of four. Some have an extra image for a nose-cone, end section, connecting segment or even a totally separate vehicle image for the front or rear car of the train. Be warned though, loops and corkscrews get into some pretty crazy geometry just to figure out which way to point the car!
But if you’re trying to figure out a coaster, just remember that coasters are like people...some may behave differently than others, but they’re all basically the same.
Flat rides are each different, too. Some, like the Snow Cups we looked at, have only one view and don’t actually turn when you rotate the map in the game. Others may have two views or even four. Some have HUNDREDS of rider images. Some have none at all.
Again, there are some differences, but they’re all basically the same.