|
Chapter
Eight ~ Dr J's Object
Editor ~ Buggy's
RideMaker ~ |
Tanned, rested and ready? Excellent! NOW the work begins. Actually this part isn’t THAT difficult, but like the rest of it, MUST be done correctly. There may be some boring "grunt" work involved, but hopefully you’re excited enough about finally seeing your RCT Ride working on-screen that you won’t care. (I know that’s how I used to feel at this point!)
Since Dr J and Buggy’s RideMaking programs vary so greatly, we’ll cover each of them separately.
The advantage of using this program is that you get to SEE what’s happening. Personally, I’m a visually-oriented person...if I SEE something, I understand it more quickly. With this program, you can also manipulate images -- fixing pixels, tweaking positions. It’s really GREAT for some projects.
However, the DISadvantage is that it only allows you to use the Twist/Snow Cups as a Base Ride. Another (the one we’re about to bump our heads on) is that images must be loaded individually...one at a time.
Remember I mentioned "grunt" work? This is it.
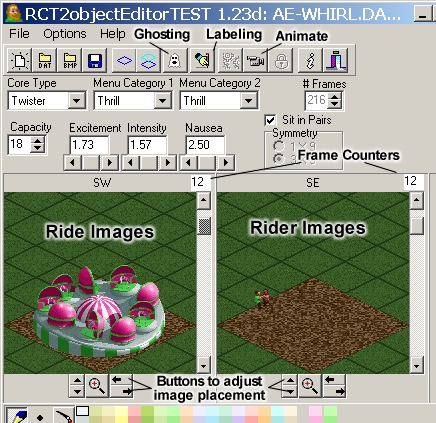
You’ll need to click File/New/Attraction/Flat-Animated to create a new, blank ride file. By default (depending on your version...the FINAL version is 1.23d), the "Vehicle Designer" will open. It’s only function might be to help you understand the movement of the Twist/Snow Cups as a Base Ride. Otherwise, close that window to return to the main program.
You’ll see two window panes in front of you...the left marked SW and the other SE. They actually show you the ride from the same angle...NOT rotated as you might expect.
Our Ride Images will go into the pane on the left (SW). To insert an image, click File/Open Bmp..., which will open the standard Windows file browser. Select your FIRST Ride Image and click "OK."
Now the program basically wants to know if it’s a Ride image or a Rider image. Click the "SW" button and the image will magically appear in the left-hand window pane. Amazing!
One down...23 more images to go.
So, scroll the bar so that the counter says "1." Now repeat the image insertion process we just did to insert the next Ride image into the window pane...again.
All right, NOW we’re making progress. Scroll down one frame so the counter says "2." File/Open Bmp...and insert the THIRD ride image into the frame. See? I told you this was going to be boring.
Keyboard Shortcuts
Actually, here’s a little trick. I use the keyboard shortcuts so I don’t have to mess with the mouse:
Hit Alt+F, then P -- This will open the File Selection Window. Notice that the previously used file name is automatically loaded and highlighted.
Hit the RIGHT Arrow once -- This moves the cursor to the end of the file name
Hit BACKSPACE -- This removes the last digit of the numbered file’s name
Type a 5 (or whatever the next number in the sequence would be) -- this selects the NEXT file in the animation sequence.
Hit ENTER twice -- This selects the file you’ve named, and when the "Viewpoint" box comes up, it will already have the "SW" button selected. Hitting ENTER again is like clicking that button.
Your Ride image is loaded...and you didn’t need to touch your mouse!
Another handy shortcut: If you have previously clicked on the scrollbar of the left window pane, pushing the DOWN Arrow button on your keyboard will advance the thing one frame...setting you up to repeat the other keyboard shortcuts immediately.
Granted, it’s still tedious work, but perhaps a bit less slow. Luckily, you only have to input them once. After frame 24, the program duplicates them automatically.
Okay, you’ve got all 24 Ride images into the program. Let’s make sure they’re in the right order. Click the little movie camera button at the top of the screen and your ride images will animate. YEEE-HAAAA!
But, chances are that your ride isn’t centered on the brown dirt tiles...this IS important, but we’ll deal with it later. DON’T ADJUST THEM NOW!
All right, now that the Ride images are installed, we turn our attention to the Riders...remember those 200+ little pictures we made? They have to go in the window pane on the right (the one marked "SE").
Scroll back up to the top so that the frame counter says "0." Do the same as we did previously to insert the Ride images and select your first Rider image.
After you click "OK" this time, you want to slick the "SE" button. This will place your Rider image into the window pane on the right...which is right where we want it.
The keyboard shortcuts we used earlier will work just the same for the Rider images.
One down, 215 more to go...so, go ahead and insert all of your Rider images. I’m gonna go get myself a burger.
Finished? EXCELLENT! (Nobody said this was going to be easy...and if they DID, they lied.)
Okay. If you click the animate button (the movie camera), you should see the Ride and Riders moving in their separate frames. To see them TOGETHER, click the little button at the top with the ghost on it. This will create an animated, ghosted image of your Ride with the Riders on top...the way the game will see them later.
If we’ve done everything correctly up to this point, they should each be in their little seats and having a WONDERFUL time. (Meanwhile, we’re beginning to wonder why we ever STARTED this project.)
OR, maybe you’re getting excited now? GOOD! There’s work to do.
You’ve doubtlessly noticed that although the riders are perfectly aligned with the ride, the ride itself isn’t properly centered on the pad. We’re about to correct this.
Below the window panes, you see a magnifying glass flanked by four buttons. These buttons will move the entire image up, down, left or right. Now lining it up becomes easy!
...of course, EVERY image must be moved the same amount...one...at...a...time.
Did I SAY the grunt work was over? I think not.
Here’s a little system that I’ve used to make the process a little easier. It requires both the mouse AND the arrow keys.
Click on the scroll bar of the SW pane...it should be blinking at you now. Click on the arrow keys, up, for instance, and COUNT how many times you click. Then hit the DOWN Arrow key to advance to the next frame.
Hey, I said it would be EASIER, not less BORING.
Repeat this as necessary to get the ride centered on the dirt pad...up, down, left or right as required.
As before, you need only move the FIRST 24 Ride images. The program takes care of the rest of those after that. Which is good, because we have to move ALL the Rider images individually...the SAME direction and the SAME amount.
THIS time you can use the "ghosting" feature to make sure they’re in just the right spot. At least you’ll have something interesting to look at while you’re clicking and keying.
I’ll see you when it’s over...
Naming the Ride
So, you’ve gotten all the images lined up, checked them with the movie camera button and everything looks great. COOL! SAVE THAT FILE! You don’t want to have to do all THAT again, do you?
Now we adjust the particulars for the ride...including the name, eventually. We’ll be working with the input boxes at the top of the screen:
Core Type: Nothing to adjust, here. This Editor provides for only one ride type, "Twister."
Menu Category 1: Select which menu your ride will appear in during the game.
Menu Category 2: If it should appear in TWO categories, select the other one here...but be logical. If it’s NOT a water ride, don’t make it appear there. Folks won’t know where to look for it.
Capacity: Unless you have a SPECIFIC and DARNED GOOD REASON, don’t change this. It can make things behave strangely in the game.
Excitement/Intensity/Nausea: Play with these settings if you absolutely MUST, but it won’t affect things enormously in the game. SOME, but not much.
Sit in Pairs: Obvious. If they DO sit in pairs, then check the box. If they don’t...don’t.
Save your file again. (I do that a lot, myself...HATE to back-track.)
Okay, NOW we get to the particulars of naming your new ride! Click the hand & pencil button at the top of the screen.
WOW! All that stuff from clicking one button!
Okay, click the appropriate language and type in the name for your new ride. THIS is what will appear later in the Ride Selection List in the game’s Scenario Editor. Try to fill in as many languages as you can.
Click on the "Description" tab. Here you input...well...a short description of the ride. This also appears in the Scenario Editor and in the game itself.
Click on the "Capacity" tab and fill in what the capacity of your ride is..."18 passengers" for example.
Click the "Edit" tab. If you’re NOT multi-lingual, simply use the button to copy your language’s text into the other boxes...guess foreign folks will be on their own. Sorry about that, Spain.
When you’re finished, click the hand & pencil button again to close that window. SAVE YOUR FILE! WE’RE DONE!
Well, we’re done building the ride, anyway. We still have to test it.
Hey! Don’t we get to make one of those snappy preview images of the ride? Not in Dr J’s Editor...no. The game will simply use the ride’s first animation frame instead. If you want your ride to have one of those preview images, I'll explain how in to do that in Chapter 10 using...
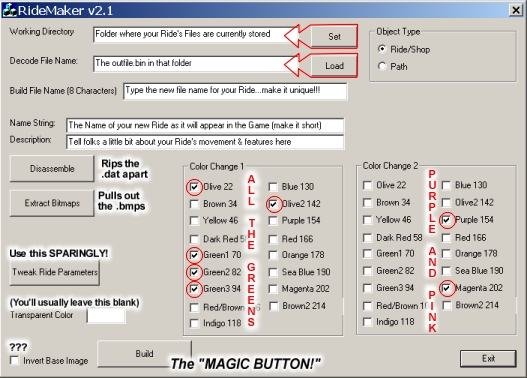
First step; open Buggy’s RideMaker. Looks rather daunting, doesn’t it? WHY does this program seem to scare people? Is it the powerful looking interface? Is it the stern complexity? Is it the fact that the word "toilet" is in the file description? I don’t know.
What I DO know is that it’s the most powerful program commonly available for making RCT2 rides.
Somewhere on your computer you have a folder containing all the little pictures and files needed to make a ride:
- A .dat file - The original RCT2 Ride file that you’re using as a Base Ride
- An outfile.bin file - It’s a mystery. Don’t touch it. It burns.
- A pos.txt file - A set of coordinates for every image the ride needs....which since we’ve REPLACED those images, is now completely inaccurate.
- A BUTT-LOAD of bitmap files -- We worked hard to get those little beauties...and it’s about to pay off!
Where Dr J’s Editor required us to input every image file one at a time, Buggy’s doesn’t require that. As long as they’ve got the proper name (which is why we paid so much attention to renaming the things earlier), they’re already set.
Let’s de-mystify the controls on this program a bit. It’ll be less scary that way.
Working Directory: This is the path to the folder where all the Ride’s files are waiting. Clicking on the "Set" button will bring up a standard Windows File Browser. Find your RideFolder, click on the .dat file...or ANY file that appears in that folder...and click "Open." The Working Directory has been set. (That wasn’t scary, was it?)
Decode File Name: This is the name of the original RCT2 Ride that you are using as your Base Ride. Click on "Load" to bring up a file browser. Find and click on the ORIGINAL .dat file (OR the outfile.bin in that folder) and click "Open." The Decode File has been loaded.
Build File Name: This is where you type in the file name for your finished ride. "ATOMCENT" for example. There IS an 8 character limit. RCT2 doesn’t support long filenames like Windows does. Keep it to that length and everyone will live in harmony.
Object Type: Are you making a Ride/Shop or a Path? We're making a RIDE!!! Select the appropriate radio button.
Name String: Here’s where you type the NAME of your ride as it will appear inside the game. "Atomic Centrifuge Spin" for example, could be a Name String. ("String" is programmer-speak for a word...which a computer sees as just a "string" of letters.)
Description: This is where you type in the description of your ride that will be shown in the game. Something like, "Guests ride in spinning pods that rotate so fast they completely disintegrate on a sub-atomic level, never to be heard from again. Place a First Aid Station close by...and lots of Handymen."
The "Disassemble" and "Extract Bitmaps" buttons won’t be needed to build the ride...we covered them in a previous chapter, anyway. But for the sake of completeness, "Disassemble" rips the outfile.bin and pos.txt files from the ride so we can peek at them. "Extract Bitmaps" shows all the image files in the ride so we can study them.
Color Change 1: This where we tell the program what colors in our pictures will be paintable in the game. I usually stick with the standard pink and green used by the other rides...although ANY color can be made a paintable color (except black or white, which aren’t listed). You can select as many of these as you need.
Color Change 2: Identical in working to Color Change 1, this one sets the second paintable areas.
Transparent Color: Default is Black. You CAN change this value, but it can get confusing and difficult to work with. If it ain’t broken, don’t fix it. You don’t have to put anything in this box.
Invert Base Image: Don’t know what it’s for. Never needed it. Don’t care.
Build: When you’ve got everything set, THIS magic button will make everything happen.
Tweak Ride Parameters: Go ahead and click it...you KNOW you want to...
In this part of the program we have:
Ride Type: Determines which menu your ride appears in during the game...that’s all. You can select two if you like...if it’s a Thrill AND Water Ride, for instance. But be logical about it. If it’s NOT a Thrill Ride, don’t put it there. make it easy for folks to find your ride and use it.
Ride Statistics: As I understand it, these can be used to alter the original settings slightly...SLIGHTLY! The settings are coded into the base ride itself, but using these will change it as a percentage. For instance, if you use the Merry Go Round as a Base Ride, you can’t give it a REALLY high excitement rating. You can make it a LITTLE higher, but it will never be as exciting as, say, the Enterprise.
Ride Properties: "Allow Remap Colors 1 and 2" should both be checked by default if your ride is paintable in the game. "Riders Get Wet" and "Ride is Covered" are pretty self-explanatory...check them if you need them.
"Allow Color 3 Remap" is possible to use, but it ain’t easy. There’s no way to select what color it uses. There’s a particular set of THREE shades of yellow that the game can use to create a third paintable area. They’re tricky to use...and chances are you won’t honestly need them anyway.
Riders: As we discussed at the end of Chapter 3, it IS possible to change the number of Riders that your ride will hold, but it may not be a good idea. Changing it to a LOWER capacity isn’t generally a problem. RAISING the capacity can make things work strangely. Lower it at will...raise it at your own risk.
"Special Cars" probably refers to rides like the Mine Train Coaster...which has a different capacity for the front car of the train (2 riders instead of 4). I’ve not used this feature...never needed it...so if you want to play with it, you’re on your own.
Riders Ride in pairs: This should be checked if...well...you know.
Okay, now that you’ve taken the grand tour, click the "Cancel" button and we’ll get on with our project.
Buggy’s RideMaker is NOT that difficult to use...if you understand the controls. It’s actually fairly intuitive -- well, in a way. The steps we need to follow are simply taken from the top downward.
To make life simpler, place all the pieces in the same folder:
- Original ride’s .dat file
- The outfile.bin file you got when we peeked inside it
- The pos.txt file
- The OLD ride’s first three images; pic000.bmp, pic001.bmp & pic002.bmp
- All of your shiny new .bmp files - which should start at pic003.bmp
First we need to set the "Working Directory" to tell the program where the files are located. You learned how to do that in the tour. Click the "Set" button and select ANY file in your RideFolder
The next line down is the next step. Click "Load" and select the .dat or outfile.bin in that folder.
Next step, pick a file name for your completed Ride.
Make sure the file name is something UNIQUE! If it conflicts with another ride -- original or custom-made -- you’ll make a LOT of people angry when their scenarios quit working. ALL of my ride files begin with "AE-" and then a five letter descriptor... "AE-WHIRL" for instance. It makes certain they’re unique (no other AE’s in the RCT Community making Rides) and people can find them easily when they’re scrolling through their objData folder looking for something I’ve made.
Next step, name the ride. Give it a catchy title so that folks will be anxious to try it out in their RCT Parks. I Always thought "FREE MONEY" was a good ride name, but never found a ride to fit it.
Go to the next line down and type in a description. Try and say a little something about how the ride moves, what it does, etc. I usually sign my rides there..."by The Amazing EARL." It doesn’t get in the way like it would if it were in the name...and folks still see it.
Next up, Color Changes 1 & 2. No matter HOW CAREFUL you’ve been with your models, colors can be unpredictable. You might think that selecting "Green" or even ALL THREE Greens on that list would cover the spectrum and make your ride paintable...but sometimes it doesn’t. Often green hues get altered by shadows.
To compensate, I always select ALL FIVE Greens..."Olive 22," "Green1 70," "Green2 82," "Green3 94" & "Olive2 142." This makes anything even REMOTELY green into a paintable area.
What are the numbers after the colors? It’s technical, involving the specific layout of the colors in the RCT2 palette. You don’t really NEED to know, anyway...and if I told you, I’d have to kill you.
For Color Change 2, I do exactly the same thing. That pink has a tendency to lean toward purple sometimes...especially in shadows. So I always select BOTH "Purple 154" and "Magenta 202."
Occasionally you’ll have some problems with the pink turning into a shade of red, brown or even orange (for some odd reason). But those are fairly rare and can be fixed in the 3D model...or one pixel at a time...which makes you REMEMBER to fix the color on the model.
Okay, Color Changes are selected. Next step would be to "Tweak Ride Parameters" if ABSOLUTELY necessary.
Once all that is finished, it’s time to press the Magic "Build" Button...and pray.
Click it. Stand back and hold on.
If you’ve lived a good life, been kind to animals and eaten all your vegetables, you SHOULD now have a shiny new .dat file in that folder you specified in the "Working Directory." Navigate there now and have a look.
<AE holds his breath>
It’s there? It’s there! The .dat file is REALLY THERE!!!
Slow down, Hot Rod...it ain’t finished yet. The pos.txt needs to be dealt with first.
Where are Mulder and Scully when you NEED them? This thing can be confusing, but I'll do my best to put it in simple terms.
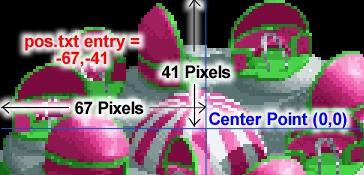
In Chapter 2 under "HOW THESE THINGS WORK," we briefly discussed the pos.txt file -- a simple text file that’s editable in the Windows Notepad and contains X and Y coordinates for every image of your ride.
Open the pos.txt file by double-clicking on it and have a peek.
It’s a MESS, ain’t it? Well, ours will be a bit more orderly.
Briefly, the pos.txt file tells the game where to place each image. For Flat Rides, it uses the exact center of the brown dirt tiles as 0,0 and lines that up with the TOP-LEFT CORNER of the ride image. Then the game consults the pos.txt file, finds the line that corresponds to that image and uses those X,Y coordinates to move the ride RIGHT (X) and UP (Y) that number of pixels to precisely where it needs to be.
For Tracked Rides, the game uses the point on the track directly beneath the center of the car as 0,0 and moves it according to the pos.txt entry. If the track is a suspended type -- where the vehicle hangs below the track -- it uses the point where the car connects to the track as 0,0.
The original pos.txt is SUCH a mess because the images are cropped more closely than ours and are probably all different sizes. However, OUR images are all the same size. ALL the entries in OUR pos.txt will be exactly the same! How cool is THAT?
Well they won’t ALL be the same...the first three entries are always 0,0. They’re for the preview image (pic000.bmp) and the two tiny mystery images (pic001 & 002.bmp).
But what will our coordinates be? There’s a simple way to find out.
Open the first actual Ride image (pic003.bmp) in your Bitmap Editor and zoom in until it fills the entire screen. We’re gonna count pixels.
Figure out where the EXACT CENTER of the ground beneath your ride would be....remember though, we’re thinking in three dimensions, here. Once you’ve figured out where ground zero is (actually, ground 0,0), make a one-pixel dot.
NOTE: On Tracked Rides and Coasters, you would use the point where the CENTER of the Control Spheres were located on your 3D model...THAT’S where your (0,0) goes.
Count how many pixels lie between that dot and the LEFT side of the image...INCLUDING the dot. GREAT! That’s our X value.
Now count how many pixels lie between the dot and the TOP of the image...again, INCLUDING the dot. EXCELLENT! We’ve got our Y value.
Go to your pos.txt file and on the FOURTH line, replace those old X,Y values with our new ones...make them negative numbers. That’s how it’s done!
All you need to do now (and this is the "grunt" work part) is replace every line with those values. There’s an easy way to do it, though.
Consider that you need one set of coordinates for every Ride and Rider image. How many images are there? (Hint: In WindowsXP, simply highlight all the images in your RideFolder and right-click/Properties. It’ll tell you how many files are selected.) Let’s say there are 240 total images...
In the pos.txt, select the newly altered line of X,Y coordinates and press Ctrl+C to copy them to the clipboard. Move your cursor to the next line and hit Ctrl+V to paste. You’ve got TWO new lines now. Continue pressing Ctrl-V until you have ten new lines.
Now, highlight those ten lines and copy them to the clipboard. You need 240. You’ve got ten on-screen and ten in the clipboard. Hitting Ctrl+V 23 times (pasting 230 lines, ten at a time) will give us the number of lines we need. Delete all the OLD lines (except the first three)...and you’ve got your new pos.txt! SAVE THAT FILE!
Not TOO difficult, eh? Well, not with this ride, no...but try that with a 4,000+ image coaster and it gets a bit tedious...shortcuts or not.
By the way, if your Flat Ride has two or more views, you may have to make different X,Y calculations for each view. Not that big a deal, but be aware of it. They’ll need to alternate in the same pattern as the Ride/Rider images do.
Now that the pos.txt file is fixed (for now), re-open Buggy’s RideMaker and build the ride again, following the same steps as before. It should be fairly simple for you this time around since you’ve already done it once.
Don’t bother writing anything elaborate in your ride description...this won’t be the last time we build the ride. We still have to test (and probably FIX) the thing and build it again.
So, you see, Buggy’s RideMaker and Dr J’s Object Editor are vastly different creatures to work with. Neither is really better or simpler than the other for making rides in RCT2. They each have their own strengths and weaknesses...but both come in VERY handy for ANY RideMaking project.
Well, there’s brand-spankin’-new .dat file sitting on your computer...possibly your DREAM RIDE! I’m sure you’re anxious to give it a spin. We’ll do just that in the next chapter.