|
Chapter
Five ~ Setting the Stage
~ Let there be Lights ~ Rendering
Tip - Aliasing ~ |
Now, let’s get one thing straight. This section will simply give you the finer points of making sure YOUR model works in the realm of RCT RideMaking. I am NOT going to teach you how to do 3D Modeling. Take a class someplace if you have to. Do the tutorials that are available for whatever 3D program you’re using. I’m going to be assuming that you know your way around the tools.
Speaking of which, I’ll be using the program I’ve used for years, Amorphium...version 3 at the moment. I highly recommend it. It’s extremely intuitive. It’s similar to working with a ball of digital clay. And it’s about $140 bucks.
As we discussed in the "Tools" section in Chapter 1 of this little tutorial, many 3D programs are available. Links can be found in that section to suitable programs that are downloadable, cheap and some even FREE!
Since I have no idea what program you’ve selected, I can’t relate to specific tools in those programs. But they’re all pretty much the same. You’ll just have to interpret my instructions for your own program.
Step one is to open an RCT2 park and take a screenshot...one with a few park guests ("Peeps") in it. The more the merrier, I suppose. Somewhere near the center of the screenshot, place nine full-tile, square building blocks arranged in a square as shown in the example. Make certain you can see ALL the edges of it.
Save the screenshot someplace that you can find it easily. You’ll find out what it’s for later on.
Open your 3D program and let’s get busy.
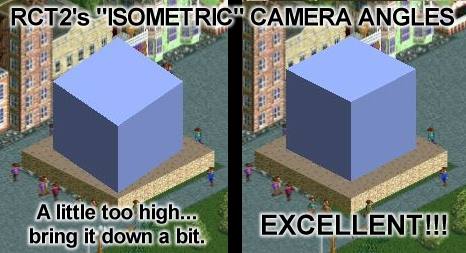
The first thing we’ll need to adjust is the camera position. RCT2 uses an "Isometric" view...but like everything else in the game, it’s not quite a standard Isometric view. (It’s a little bit off...to keep us on our toes, I guess)
Draw a cube in your 3D program and place it in the dead center of the stage. This will be our focal point. The camera should NOT be facing the dead-on front of the cube. Rotate the camera so it’s looking directly at the corner of the cube...a 45-degree angle from center. The image shows a top view of the camera position -- looking directly down on the cube.
Now we need to tilt the camera DOWNWARD at a VERY specific angle. Standard Isometric View would be 30-degrees, but as I said, RCT2 isn’t quite a TRUE Isometric view, so you’ll need to adjust it a little.
Render that cube with your RCT screenshot behind it. Amorphium lets me set that image as a background. Set it accordingly and render the image.
Compare the top of your cube to the top edges of the nine square building blocks. The cube is probably just a tiny bit wider (top to bottom) than it should be. Adjust your camera angle and render it again until they’re as close to matching as they’re gonna get.
PERFECT! Save your 3D file IMMEDIATELY...unless you want go through that adjusting process all over again. (Some people like to do things the hard way.)
I generally name that camera "Cam 1." Duplicate that camera and rotate it around your model 90-degrees. This one will be named "Cam 2." (I’ll bet you can guess where I’m going with this...) Continue around the model until you have four cameras, all pointed toward the center and all viewing the cube from the same, adjusted Isometric angle...but from each of the four corners. This will make things easier later on...trust me.
Now you have the ability to easily view your object as the game would see it when the map rotates. Cool, huh?
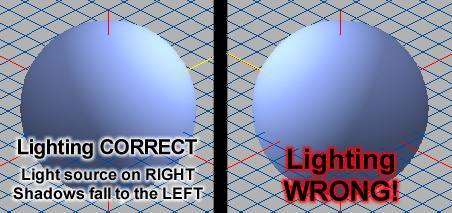
Lighting your scene is VERY important. The lighting in RCT2 ALWAYS comes from the right side. No matter which way the map is rotated, it’s ALWAYS coming from over your right shoulder as you look at the screen. This needs to be reflected in your 3D model as well.
Now that the cameras are adjusted, positioning the lights will be a piece of cake. They go in EXACTLY the same positions (and angles) as the cameras. The only difference will be in naming them.
When viewing your model through Cam 1, the light immediately on your RIGHT should be used...so, name it "Light 1." (This will save your sanity later.) Likewise, the light on Cam 2’s RIGHT should be named "Light 2." Continue with the others until all four lights are matched up with their camera counterparts.
Isn’t that slick? Now you can adjust your camera view AND lighting by selecting the camera you want and turning on the proper light.
We’re not completely finished, though. I use a FIFTH light on most of my models... placed directly above dead center and pointing directly downward. It’s placed at the same distance from the model as the other four, but NOT at full strength -- about HALF the intensity. It helps to bring out the details of the models and makes them to match the game a bit better.
SAVE YOUR 3D FILE NOW! This will become a basic template for ALL of your RCT2 models. Maybe save it twice...backups are always good.
If you are using Amorphium 3 (the program I use), I have made a Blank Template available which INCLUDES all of the lights and cameras....already set up for you. The .zip file can be downloaded HERE.
When rendering your 3D models, make sure that "Aliasing" is turned down as low as you can get it...OFF is even better. Aliasing makes your 3D model just the tiniest bit blurry, which is great when you’re going for photo-realism, but we’re not.
See, our final rendered images will be against a True Black (0,0,0) background. Because Aliasing slightly blurs the edges of your model, you’ll end up with a black line or "halo" around your image. (TRUE Black is seen as transparent by the game, but the edges would be just a shade off from True Black...so they don’t disappear.) Those halos have to be removed one pixel at a time, "pixel-pushing," which we avoid like the plague.
Granted, your models will have "jaggies" around the edges. Such is the nature of bitmap images...especially transparent ones. Look closely and you’ll see that ALL images in RCT2 have jaggies. Yours will fit in perfectly.
FINALLY! We’re about to create Riders!
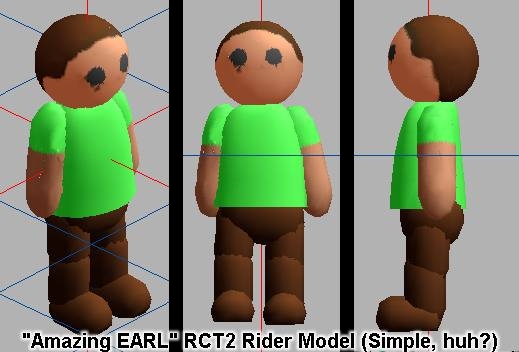
People have emailed me over the years, literally BEGGING for my Peep model. Truth is, it’s not difficult to make one. Look at the image. Analyze it. What EXACTLY are we looking at?
The Head - It’s a tan ball...with eyes. The back is painted brown to look like hair.
The Torso - A tapered, slightly flattened cylinder, rounded at the top, bumped out a bit at the belly and painted green.
The Arms - A capsule (ball that’s stretched in the middle), painted tan and green
The Hips - Another, shorter capsule, painted brown
The Legs - MORE brown capsules
The Feet - Half a capsule...painted brown. Whoopie-doo.
That’s it! There were a couple of reasons I never shared my model. First, Amorphium doesn’t "play well with others." It can export meshes/objects, but they seldom come out well in other programs. (I know that objects from other programs don’t IMPORT well, for sure.)
The other reason is that they seemed so fascinated with the thing and were expecting something almost "magical." And it was really just this bunch of standard objects...painted tan, green and brown. I was almost embarrassed by it’s simplicity, really.
But the point isn’t that the Peep model must be perfect. Just the opposite, in fact. When it’s seen in the game, it’ll only be a few pixels high. Detail will be lost completely! Save the Michaelangelo stuff for your ride, itself.
I’ll be putting versions of my Peep model -- in different formats -- into a .zip file that will be available for download at RCT Space with this tutorial.
Now, let’s get into the details. The model isn’t perfect, but it DOES have some features that may not meet the eye at a casual glance.
The head is just a sphere painted tan and brown. One important thing to remember, by default RCT Rides use True Black (0,0,0) as their transparent background. The hair is a medium/light brown so that when it is in shadow, those shadows will NOT be truly black. If ANY part of the model shades as true black, you’ll have to recreate it pixel-by-pixel later on. Save yourself some trouble and experiment a little to find the right shade of brown for your program(s).
The eyes are also brown. If we made them black, they’d disappear in the game. I make them the same color as the hair for safety’s sake. Later they’ll only be ONE pixel, so it’s not a really big deal WHAT color they are.
The skin tone is matched as closely as I could get to the color on the Guests in the game. It took a lot of experimentation...which you can see in some of my earlier work, the "Runaway Reindeer" ride especially...the Riders look just a little bit "Eskimo" in that one.
The pants and shoes are just the same dark brown as the hair.
The shirt? Ah...THAT color is important. It’s a TRUE Green (0,255,0)...which is the color the game changes to match the shirt of the guest your Peep will represent on the ride. Remember we discussed that stuff back in Chapter 2 - "How Rides Work"? Go back and re-read that if you have to...there’s no shame in it, really.
But weren’t some Rider images wearing PINK shirts? Very good! Yes, there were. That pink is a very special shade as well. It’s close to Magenta (255,0,155), but not a TRUE Magenta (255,0,255). I’ve found that later on, TRUE Magenta often is read by the various Bitmap Editors as a strange shade of purple. Backing off on the blue seems to fix that just about right.
Note: These colors are approximate. I’ve tweaked them over the years and ALWAYS had to do a little bit of pixel-pushing later...fixing problems here and there in a bitmap editor. These colors aren’t perfect, but they’ll get you pretty close.
Remember, colors are also interpreted differently by 3D programs according to the lighting in your scene and the properties of the material. As I said, they’re a good starting point, but you may have to adjust them for your own set of programs.
If you are using Amorphium 3 (the program I use), I have made a copy of my Rider Model available which INCLUDES all of the lights and cameras....already set up for you. The .zip file can be downloaded HERE.
I'm also making a .3ds version is available. It's a direct export of my Amorphium3 3D Model. I make no guarantees as to it's usability after you import it. The conversion process can do some strange things.
You can download the .zip file HERE.
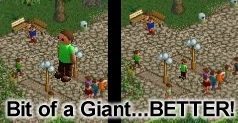
Okay, now that we’ve created the Peep, we need to step back a bit...literally. As I said before, he’ll only be a few pixels tall in the game. So we’ll zoom out on your camera so he’s really small.
How small? That’s where the screenshot you took earlier comes in to play again. Set it accordingly and render the image.
Hmmm...still looks too big. We want to get him the same size as his counterparts in the screenshot. Zoom out a bit more...PERFECT! (Neat little trick, huh?) Adjust ALL FOUR CAMERAS to that same distance from your model and SAVE THE TEMPLATE.
Here’s a little test...since you CAN make scenery objects in RCT2, right? That IS a prerequisite for this tutorial, remember? Render the image of the Peep and turn it into a scenery object...and I think you should name him Herbie!
This will also test the green or pink you’re using for the shirt. Dr. J’s Object Editor uses exactly the same colors to make objects paintable as the game does to change the guest’s shirt color. If the color isn’t quite right to mask easily in Dr. J’s Editor, adjust it on your 3D model.
Now, open the game and test Herbie. Stand him next to a path somewhere and compare him to the other guests that enter the park. Does he look like he fits in with their crowd? How’s his skin tone? Too dark? Too light? Adjust that on your 3D model and try it again.
A SLIGHT difference will not be noticeable. After all, THIS Peep will only be seen on your ride...away from the rest of the maddening crowd. But if his skin is WAY too pink or a BIT too yellow, people will notice.
To make modeling easier, you may want to duplicate your cameras and rename them. This will allow you to zoom in and out on your model with the new cameras, while keeping the old ones available for rendering at game size. You DON’T want to lose those settings on the originals, right?