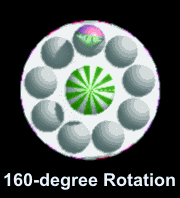
| Okay, so how does that translate into
our animation? Well, the ride would need to rotate 4/9ths of a
rotation in a single animation sequence. Using the current position
as a starting point, we simply rotate the center sphere 160-degrees
(4/9ths of a circle)...allowing the 3D program to animate it
automatically to the end of the sequence.
Because the track is not level on this ride, the discs may need
to be adjusted in order to keep them on the track. Simply moving
them vertically until they appear to be sliding on top of the gray
track does the trick. Now we’re ready for a test render of the
animation.
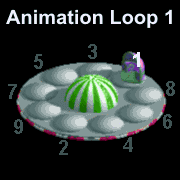 Looking
at the rendered sequence, we follow ONE car around the track...if it
takes 9 rotations to return to the exact point where it started,
then we’re one step closer to our ride! YAY! YAY! Break out the
Champagne! Looking
at the rendered sequence, we follow ONE car around the track...if it
takes 9 rotations to return to the exact point where it started,
then we’re one step closer to our ride! YAY! YAY! Break out the
Champagne!
Um, not so fast, Sparky. We haven’t made the cars spin around
on their discs, yet. That’s gonna take some doing, first.
You see, at the end of each loop, the Car 1 is actually replaced
by Car 5. At the end of the next loop, Car 5 is replaced by Car 9,
then Car 4, 8, 3, 7, 2, 6 and finally Car 1 again. To make THIS
happen, we need to do it by hand.
We begin by animating Car 1, rotating the disc beneath it so it
turns realistically as it travels around the track. REMEMBER THE
POSITION YOU LEAVE IT IN AT THE END OF THE ANIMATION! You’ll need
to MATCH it in a minute.
Going back to Frame 1, Car 5 is now sitting exactly where Car 1
was a second ago. We need to rotate Car 5’s control disc to match
it. It doesn’t have to be perfect, but the closer, the better.
Now animate Car 5’s spin as it travels through the
animation...up and down the rolling track, noting it’s position in
the final frame. Two down, seven more to go.
Returning to frame one, Car 9 has now replaced Car 5. We repeat
the animation process with each car in turn, 9, 4, 3, 7, 2 and
6...matching the final position of Car 6 to the STARTING position of
Car 1.
 Note:
This is the same method used to animate the spinning cars on my
"SkyDiver" ride. Exactly the same thing, but done
vertically around an axis instead of on the discs. Note:
This is the same method used to animate the spinning cars on my
"SkyDiver" ride. Exactly the same thing, but done
vertically around an axis instead of on the discs.
Granted, all of this IS NOT NECESSARY if your cars don’t spin.
For instance, a Merry-Go-Round type of ride wouldn’t need this
extra animation since the seats on it don’t spin...just rotate
around the center of the ride. But if you wanted them to go up and
down, the process would be very similar.
Render your one second, 24-frame animated .gif and save it as
"MyRIDE.gif." Take a look at it in action. Do the cars
spin convincingly? Do they move the way you want them to? Perhaps
you’ll just want to look at it for a while...a lot of work went in
to that 1-second movie! And more is to come before it ever sees the
world of RCT.
Take a break, have a cookie (maybe a nap) and we’ll
continue...but SAVE YOUR FILE FIRST!
Tracked
Ride & Coaster Modeling
Okay. If you’re NOT looking to do a Flat Ride, then you can
ignore much of what I’ve said so far in this chapter. Much,
but not ALL. Modeling a tracked ride or coaster gives you a
lot more freedom...and takes far less ACTUAL modeling. However the
animation portion can easily make up for that in difficulty.
However even if you’re NOT doing a coaster, ALL the Vehicle
Based rides follow the same basic format as a rollercoaster and have
the same basic modeling requirements.
For this exercise we’ll be using my "Dream Woodie" as
an example. It’s the first custom coaster train I ever
created...and pretty basic as rollercoasters go. I may even give
some insights about how the riders were animated.
First of course, you’ll need your Peep model arranged however
you want him to ride...sitting down, standing up, upside down
hanging by his ankles...whatever.
But, just like the Flat Ride section, we’ll begin with a
Control Sphere. The sphere will be rotated by the 3D program to
animate the various views of the vehicle.
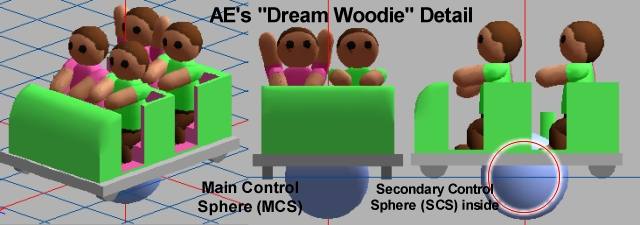
The center of this Control Sphere is located at the EXACT CENTER
of the BOTTOM of the vehicle...right where it would meet the surface
of the track.
If the vehicle has wheels, the sphere’s center would be level
with the bottom edge of the wheels.
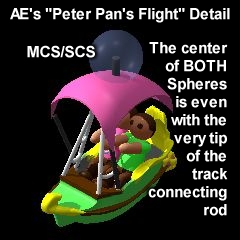 If
you were doing a suspended vehicle of some sort -- one that hangs
below the track -- it would go right at the point where the vehicle
hooks to the track. If
you were doing a suspended vehicle of some sort -- one that hangs
below the track -- it would go right at the point where the vehicle
hooks to the track.
If you happen to be doing a ride based on the Bobsleds, Dinghy
Slide, etc., treat it like a vehicle that hangs from the track.
Although the vehicle isn’t actually attached to an overhead track,
the swinging motion is the same and accomplished in the same way.
For many coasters, a second Control Sphere is required. This one
goes in exactly the same place, but is used for a different reason.
It will control the banking angle of the vehicle. Any time that the
vehicle is required to swing wide on turns, take banked curves or
corkscrews, etc., you’ll need a second Control Sphere.
The Linking Hierarchy looks like this:
- Main Control Sphere (MCS) -
Controls rotation. Turning this will rotate the entire model.
- Secondary Control Sphere (SCS)
-
Linked to the Main Control Sphere. Controls banking angle.
Changing angle on this will tilt the vehicle up, down or
sideways independently of the position of the Main
Control Sphere.
- Vehicle - Your model.
Grouped with the SECONDARY Control Sphere.
- Riders - Your Model(s).
Grouped with the vehicle...strapped in and hangin’ on, I
suppose.
 Modeling
the vehicle isn’t all that hard. They’re so tiny that very
little detail is necessary. I sometimes get pretty elaborate with
them, though...like the ride vehicles I did for the Disneyland
"Space Mountain" Coaster. Modeling
the vehicle isn’t all that hard. They’re so tiny that very
little detail is necessary. I sometimes get pretty elaborate with
them, though...like the ride vehicles I did for the Disneyland
"Space Mountain" Coaster.
The important thing on these is size. Ride vehicles, especially
coaster trains, are set a particular distance apart. That’s
hardcoded. You’ll need to take that into consideration when
building a train of any type...coaster or transport. Make the
vehicles much larger/longer than the originals and you’re in for
trouble with them overlapping down the road...er...track.
But if the vehicle you’re building is NOT part of a train, like
a water ride, go-kart or wild mouse...it’s not that much of a
consideration. You STILL have limits on size (don’t go crazy on
them), but they’re a little bit more forgiving.
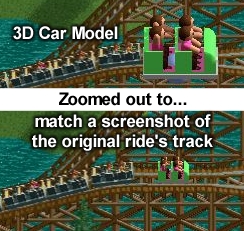 You
also need to make sure that your vehicle will fit on the track,
later. Remember what we did back in the Flat Ride modeling portion
of this chapter? The Rendering-Over-A-Screenshot Trick? That works
for vehicle based rides, too. You
also need to make sure that your vehicle will fit on the track,
later. Remember what we did back in the Flat Ride modeling portion
of this chapter? The Rendering-Over-A-Screenshot Trick? That works
for vehicle based rides, too.
Open RCT2 and build the coaster/ride that you’re using as a
Base Ride. Then take a screenshot of the track - and maybe a few
cars when it’s in operation. Use that screenshot image as a
background and follow the instructions given in the Flat Ride
section of this chapter...making sure that your vehicle fits on it’s
proposed track design and isn’t much bigger than the ride’s
original vehicle.
Can’t we make our OWN track styles in RCT2 to go with our
new custom coaster? Nope. Track images are all completely
hardcoded. Did you SEE any in the .dat file when you opened it? NO?
Well, I guess they can NOT be edited, then. Sorry, Mate. You’re
stuck.
How
a Coaster works
Okay, you’ve got your vehicle model created and your Peep model
is anxiously sitting inside this death trap you’ve made. Now what?
We animate.
LOTS!
As in the Flat Ride modeling portion of the chapter, we’ll be
outputting the artwork as an animated .gif. Believe me, it saves a
LOT of time. I wouldn’t go back to the OLD way for a MILLION
bucks...well, make me that offer and we’ll see.
Since the "Dream Woodie" will be using the RCT2 Wooden
Coaster Trains as it’s Base Ride, let’s see what the Ride Table
entry has to say about it:
Wooden Coaster Trains (ptct1.dat)
Riders Visible?: 4 Riders per car
Tracked: Yes
Hardcoded Pieces: Track & Station
Total Frames: 2,160 (Ride: 720 /Riders: 1,440)
NOTES: None
Four Riders per car...got it. Looks like the Track & Station
are hardcoded, but it’s not like we really needed to change them
anyway. 720 Ride Images needed of the vehicle. Okay. But what
pictures exactly?
Glad you asked!
Let’s rip the ptct1.dat file apart with Buggy’s RideMaker
program and have a look at it’s guts.
The preview picture (pic000) is standard, as are those two
single-pixel images (pic001&002) that every RCT2 ride has.
Analyzing the Ride images we have...
pic003-034 A 32-frame clockwise rotation sequence (ALL
Vehicle-Based Rides go clockwise, by the way)
-----If your Base Ride does NOT do hills, the images probably
stop here-----
pic035-038 A 4-frame rotation with the car tipped UP 11.25
degrees
pic039-042 A 4-frame rotation with the car tipped DOWN the
same amount
pic043-074 A 32-frame rotation with the car tipped UP 22.5
degrees
pic075-106 A 32-frame rotation with the car tipped DOWN
the same amount
-----If your Base Ride does only GENTLE hills, the images
probably stop here-----
pic107-114 An 8-frame rotation with the car tipped UP 45
degrees
pic115-122 An 8-frame rotation with the car tipped DOWN 45
degrees
pic123-154 A 32-frame rotation with the car tipped UP 67.5
degrees
pic155-186 A 32-frame rotation with the car tipped DOWN
the same amount
pic187-190 A 4-frame rotation with the car tipped UP 78.75
degrees
pic191-194 A 4-frame rotation with the car tipped DOWN the
same amount
pic195-226 A 32-frame rotation with the car tipped UP 90
degrees
pic227-258 A 32-frame rotation with the car tipped DOWN
the same amount
pic259-262 A 4-frame rotation with the car tipped UP 105
degrees
pic263-266 A 4-frame rotation with the car tipped DOWN the
same amount
pic267-270 A 4-frame rotation with the car tipped UP 120
degrees
pic271-274 A 4-frame rotation with the car tipped DOWN the
same amount
pic275-278 A 4-frame rotation with the car tipped UP 135
degrees
pic279-282 A 4-frame rotation with the car tipped DOWN the
same amount
pic283-286 A 4-frame rotation with the car tipped UP 150
degrees
pic287-290 A 4-frame rotation with the car tipped DOWN the
same amount
pic291-294 A 4-frame rotation with the car tipped UP 165
degrees
pic295-298 A 4-frame rotation with the car tipped DOWN the
same amount
pic299-302 A 4-frame rotation with the car tipped UP 180
degrees (completely upside down)
pic303-306 *A 4-frame rotation with the car tipped UP
11.25 degrees
pic307-310 *A 4-frame rotation with the car tipped DOWN
the same amount
pic311-314 *A 4-frame rotation with the car tipped UP 22.5
degrees
pic315-318 *A 4-frame rotation with the car tipped DOWN
the same amount
pic319-322 *A 4-frame rotation with the car tipped UP
45degrees
pic323-326 *A 4-frame rotation with the car tipped DOWN
the same amount
-----If your Base Ride does NOT do banked turns, the images
probably stop here-----
pic327-334 An 8-frame rotation with the car NOT tipped,
but tilted to the Rider’s LEFT 22.5 degrees
pic335-342 An 8-frame rotation with the car NOT tipped,
but tilted to the Rider’s RIGHT 22.5 degrees
pic343-374 A 32-frame rotation with the car NOT tipped,
but tilted to the Rider’s LEFT 45 degrees
pic375-406 A 32-frame rotation with the car NOT tipped,
but tilted to the Rider’s RIGHT 45 degrees
pic407-438 A 32-frame rotation with the car tipped UP
11.25 degrees...AND tilted to the Rider’s LEFT 22.5 degrees
pic439-470 A 32-frame rotation with the car tipped UP
11.25 degrees...AND tilted to the Rider’s RIGHT 22.5 degrees
pic471-502 A 32-frame rotation with the car tipped DOWN
11.25 degrees...AND tilted to the Rider’s LEFT 22.5 degrees
pic503-534 A 32-frame rotation with the car tipped DOWN
11.25 degrees...AND tilted to the Rider’s RIGHT 22.5 degrees
pic535-538 *A 4-frame rotation with the car tipped UP
11.25 degrees...AND tilted to the Rider’s LEFT 22.5 degrees
pic539-542 *A 4-frame rotation with the car tipped UP
11.25 degrees...AND tilted to the Rider’s RIGHT 22.5 degrees
pic543-546 *A 4-frame rotation with the car tipped DOWN
11.25 degrees...AND tilted to the Rider’s LEFT 22.5 degrees
pic547-550 *A 4-frame rotation with the car tipped DOWN
11.25 degrees...AND tilted to the Rider’s RIGHT 22.5 degrees
pic551-554 A 4-frame rotation with the car tipped UP 22.5
degrees...AND tilted to the Rider’s LEFT 22.5 degrees
pic555-558 A 4-frame rotation with the car tipped UP 22.5
degrees...AND tilted to the Rider’s RIGHT 22.5 degrees
pic559-562 A 4-frame rotation with the car tipped DOWN
22.5 degrees...AND tilted to the Rider’s LEFT 22.5 degrees
pic563-566 A 4-frame rotation with the car tipped DOWN
22.5 degrees...AND tilted to the Rider’s RIGHT 22.5 degrees
pic567-598 A 32-frame rotation with the car tipped UP
11.25 degrees...AND tilted to the Rider’s LEFT 45 degrees
pic599-630 A 32-frame rotation with the car tipped UP
11.25 degrees...AND tilted to the Rider’s RIGHT 45 degrees
pic631-662 A 32-frame rotation with the car tipped DOWN
11.25 degrees...AND tilted to the Rider’s LEFT 45 degrees
pic663-694 A 32-frame rotation with the car tipped DOWN
11.25 degrees...AND tilted to the Rider’s RIGHT 45 degrees
pic695-698 A 4-frame rotation with the car tipped UP 11.25
degrees...AND tilted to the Rider’s LEFT 45 degrees
pic699-702 A 4-frame rotation with the car tipped UP 11.25
degrees...AND tilted to the Rider’s RIGHT 45 degrees
pic703-706 A 4-frame rotation with the car tipped DOWN
11.25 degrees...AND tilted to the Rider’s LEFT 45 degrees
pic707-710 A 4-frame rotation with the car tipped DOWN
11.25 degrees...AND tilted to the Rider’s RIGHT 45 degrees
pic711-714 A 4-frame rotation of the car FLAT. First frame
of an animated loading sequence...door closing, lap bar moving into
place, etc...if you want to make one.
pic715-718 A 4-frame rotation of the car FLAT. Second
frame of an animated loading sequence...door closing, lap bar moving
into place, etc...if you want to make one
pic719-722 A 4-frame rotation of the car FLAT. Third frame
of an animated loading sequence...door closing, lap bar moving into
place, etc...if you want to make one.
(*Aside from the fact that these pics are angled at 0, 90, 180
& 270-degrees to the camera,
IF and HOW these differ from the ones we did earlier, I don’t
know.)
 Here
is an animated .gif of the ENTIRE sequence. Each frame is
labeled with the car's inclination. Here
is an animated .gif of the ENTIRE sequence. Each frame is
labeled with the car's inclination.
Open it in a Bitmap Editor and
scroll to individual frames to use it as a reference. The
frame number should be indicated in your Editor.
To get the
"pic***.bmp" name for that frame, simply add 2 to the
frame number. (The Ride images start at 003, remember?)
NOTE: Be aware that while all Vehicle
Rides follow the same BASIC format, they will each have their own
slight differences. Additional or alternate images may be necessary
if the track includes corkscrews, helixes, reverses, swings the cars
on turns or has other special features. Some images may not be
needed at all. Use this list ONLY AS A GUIDE to understanding your
Base Ride’s images.
Tracked
Ride & Coaster Animation
Well, now that we know what we need, might as well figure out how
to MAKE it.
It seems that the rotations are all in multiples of four.
Setting the 3D program to output an animated .gif with 8 frames per
second should work pretty smoothly.
The first sequence is a simple 32-frame rotation. These rotations
ALL (well, MOST Rides) start with the car pointing NorthEast. Choose the
camera and use the Main Control Sphere to rotate your model into
that position.
Four seconds later, the model should be in exactly this same
position, but at the 1, 2 & 3-second marks, it will have turned
90, 180 and 270-degrees. Make those adjustments now and render your
model as an animated .gif.
What have we created? A four second animated .gif that contains
32-frames of the vehicle turned 11.25 degrees from one picture to
the other...the EXACT series of pictures we need to make the first
sequence! How COOL is that?!
For many Vehicle Based rides that run on water or flat track
only, this may be ALL you need. But for this coaster, it’s just a
drop in the bucket.
You may want to save your file at this point. It gets wild and
woolly from here on in.
Rather than making a separate animated .gif for each sequence, we’re
going to make one BIG one that contains the WHOLE SET of images
needed for the ride. This will require some tinkering with your
animation timeline, but in the end, the convenience will be worth
it.
In making the preceding 4-second animation, you probably put the
final keyframe on the 4-second mark. We’re going to move it
backward just a hair to 3.99 seconds.
Why? Won’t that mess up our animation? Not
really. One-hundredth of a second is not really enough to affect the
position. Since we’re only using 8 frames per second, the last
image (frame 32) is snapped at 3.875 seconds anyway. The minuscule
change won’t be noticeable. The NEXT image of the larger .gif
(frame 33) will be snapped at 4.000 seconds exactly...and we need
THAT picture to be of the vehicle in a completely different
position.
Returning to your timeline, the next sequence we need is a 4
frame rotation of the vehicle with it’s nose tipped UPWARD 11.25
degrees.
How do we do THAT? That’s what the Secondary Control Sphere
(SCS) is for.
Putting keyframes for each Control Sphere on your timeline at
4.000, use the SCS to tip the nose of your vehicle upward. Since
this sphere moves independently of the MAIN Control Sphere (MCS), it
will keep it in that position regardless of which way the MCS is
pointing.
Since this is only a FOUR frame rotation, go to the
four-and-a-half second mark and make another keyframe for both the
MCS and SCS. You’ll need FOUR, actually...another set being at
4.49 seconds since that is the end of this particular sequence.
Adjust the MCS so that it makes a full rotation during that half
second...and the sequence is complete! If you were to render an
animated .gif to this point, you would see 36 frames...the original
32 we saw earlier, PLUS the next four frames showing the vehicle
rotating a second time, but with it’s nose tipped upward slightly.
HOORAY! Another baby step toward glory!
Diving back in, the next sequence is identical to the last one,
EXCEPT that the car’s nose is tipped DOWNWARD 11.25-degrees.
Putting your keyframes at 4.99 and 5.00 seconds, adjust the MCS and
SCS to their proper positions...and that sequence is done!
The next sequence we need is a 32-frame rotation, so it will take
FOUR seconds on our timeline. It’s done in precisely the same way
as the last two, except that it’s longer and the vehicle is tipped
up or down at a 45-degree angle. All the same keyframe rules apply.
If the ride you’re creating is only capable of GENTLE hills,
then this may be the end of your animating nightmare. This
104-frame, 13-second animated .gif might be all you need! But
otherwise, we need to keep going.
Actually, YOU will keep going. I’ll be resting while YOU do the
work. It’s all the same process from here on out. Just follow the
previous instructions and make the adjustments listed for each
sequence earlier in this chapter. Just remember that a 4-frame
rotation lasts HALF a second, an EIGHT-frame rotation takes a FULL
second and a 32-frame rotation takes FOUR seconds.
I’ll meet up with you again at frame 301 when things get funky
again.
---------FRAME 301----------
Okay, made it this far, eh? You’re more persistent than I
thought. GOOD FOR YOU!
At frame 301, the views change slightly. We’ve got a series of
4-frame rotations -- which you KNOW how to do -- but the rotation
angle is different. Instead of pointing NorthEast at the beginning,
the next few start out pointing directly EAST...at a 90-degree angle
from the camera.
That’s the only real adjustment you need to make for them. By
starting the rotation there, you’ll get four images that are
pointing East, South (directly at the camera), West and North
(directly AWAY from the camera).
We did make images exactly like these in the some previous
rotations...as part of an 8 or 32-frame rotation, but for some
reason the game wants to look for these particular ones here.
You COULD just copy those images, rename them and plug them into
the sequence here later, but it’ll be a lot easier if you just
animate the rotation and put them in here now. It’s not like it’s
THAT difficult, right?
Another quick nap for me. I’ll see you at frame 325...
---------FRAME 325---------
Something funky happening here again. The images you’re about
to do next are for when the vehicle takes BANKED turns. Your ride
may not require these, but most coasters in RCT2 will.
It’s quite simple, actually. We’ve been using the Secondary
Control Sphere to tilt the car up and down...now we’ll use it to
tilt the thing SIDEWAYS as well.
No big deal. Pretty much the same as you’ve been doing, but
with that extra little surprise. BY THE WAY, make sure you tilt it
the proper direction! The vehicles always tilt to the RIDER’S LEFT
first, then to the RIDER’S RIGHT. Reverse the two and it’ll look
REALLY strange on turns.
Well, that’s it. I’ll leave you to your work. There’s
nothing else unusual coming up that you haven’t handled already. I’ll
see you at the end of frame 708.
---------FRAME 708---------
Here we have what looks like a simple four-frame rotation of the
car pointing NE, SE, SW & NW. Know WHY it looks like that?
Because it is! And the same sequence is there three times.
What’s that there for?
That’s used for an animated loading sequence. Although you don’t
usually have mechanically moving lap bars or doors closing on a
wooden coaster, THIS is where the animation would go if you did.
The first rotation would be of the doors completely open, then
closed a little, then almost completely closed...but since I’m not
using them on my Dream Woodie coaster, they’re simply all the same
image. The game STILL animates them, but you don’t notice it
because the images are identical.
You make your three rotations and I’ll see you in a few minutes
at the end of Frame 720.
---------Frame 720---------
HEY! I wasn’t sure you’d make it. BRAVO!
In the next chapter, I’m going to show you a REALLY COOL
time-saving trick, but since you’ve finished this part, probably
the most difficult of the tutorial, take a little break. Have a
snack. Do something nice to celebrate this HUGE accomplishment.
Actually, you may just want to take a nap. (You’ll need it.)
Raise
your hands!
OH! I did say that I’d give you a little insight into my
animated Riders, didn’t I? Well, that’s really all I
did...animate them.
On the Dream Woodie, I went through all the trouble of making
certain Riders raise their arms on hills & drops...and even lean
with the centrifugal forces when going around banked curves.
Since I know which images will be used on hills, drops, banked
turns, etc., I just moved their little bodies for every frame. It
took a LONG time and is barely noticeable in the game...but I know
it’s there, and I’m proud of it. <grin>
|