|
Chapter
Seven ~ Ride Images
~ Rendering Riders ~ Rider
Overlap ~ |
Okay, we’re still in the 3D Editor. Your ride is modeled, animated and ready to go. You saved your file like a good boy? Excellent. Now save it again under a different name - something like "MyRide-RIDERS." Now save it AGAIN under ANOTHER name - something like "MyRide-RIDE."
By now you should have three copies of your file. That’s good, because we’re going to drastically change two of them.
Open "MyRide-RIDE." The ride images in the finished .dat file are of an empty ride. So, delete the riders...ALL of them. You saved them in the other file, so there’s always that to go back to if necessary.
Using your zoomed-out, rendering-at-game-size cameras, turn on the proper, matching lights and render the thing against a TRUE Black (0,0,0) background. Make sure Aliasing is turned OFF. Remember, you’re rendering it as an animated .gif file.
Save that newly rendered beauty of a file somewhere convenient - name it RIDE.gif. Then save and close your 3D "MyRide-RIDE" file.
If your ride DOES NOT rotate with the game map (if it looks the same from all four sides and has only one view), then you’re done. Bravo! Skip to "RENDERING RIDERS." If your ride DOES rotate with the map, then read on, my friend.
To render alternate views...if your ride has a left and right view, for example...then you’ll need to select another camera and render the empty ride again. REMEMBER TO CHANGE THE LIGHTING FOR THAT CAMERA! The light ALWAYS comes from the right. The shadows ALWAYS fall to the left.
If your ride has FOUR different views, guess how many .gifs you’ll need to render? You guessed it, Sport. Just like the way the game map rotates, your first .gif should face NorthEast. The second faces SouthEast. The third SouthWest and the fourth faces...uh...I forget.
Number the RIDE.gifs and you’ll be way ahead of the game.
Open the "MyRide-RIDERS" file. This won’t be quite so easy. We can’t just delete the ride objects and leave the Riders. Why not? Well...
Earlier we discussed that when the game draws a ride, the ride itself is drawn on the screen first. The Peep image is then blitted (Programmer-speak for "drawn") on top of the ride image. ANY part of the Rider that would be hidden by the ride must be erased. The lap bar in front of him. The car covering his feet. ANY part of the rider’s body that is hidden at ANY point during the ride...EVERY SINGLE PIXEL must be erased.
But...there’s an easy way to do it. <wink>
Take every object that forms your ride/vehicle and paint it Black...TRUE Black. As black as you can make it. Then you eliminate all shiny-ness from the material. No reflectivity at all. No specular or ambient colors. Nothing.
What have we done here? RUINED OUR RIDE?! Hardly. Render a still image against a Black background and you’ll see what I mean.
Rendering the model against a True Black background makes the ride itself simply disappear. The Riders are still there, but with their proper portions eliminated...and we didn’t have to push a single pixel! (They DO look weird floating in space like that.)
Save the "MyRide-RIDERS" file, then render it as an animated .gif, just like the first one. Save the newly rendered file as RIDERS.gif.
So, what have we got? Well, if it were possible (and it would be with a lot of work) to overlay the RIDERS.gif on top of the RIDE.gif and animate them, you’d see what we’ve been shooting for all along...a perfect duplicate of the MyRide.gif. But with the added advantage that we have it in two separate parts.
Why do we NEED them in separate parts? Because THAT’S how the game uses the pictures.
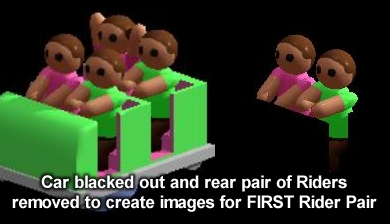
Now, are we finished with the riders? Maybe...maybe not. If your Flat Ride uses ONLY as many Rider images as RIDE images, you’re done...but that’s unlikely. Chances are that if your ride seats MORE than two riders, you’ll need MORE than one set of rider images. In some cases, one for each Rider...but MORE likely, one set for each pair.
Since the Riders are generally handled exactly like the cars -- one is replaced by another at the end of the animation sequence -- we’ll need more sets of Rider images...one set for each car.
For the Tilted Whirler, we’ll need 9 sets in all. We’ve already done the first set, but they only move the rider part way around the track. The NEXT set will pick up where the first set left off...continuing that pattern until the vehicle/Rider pair reaches it’s original position...in this case, 9 animation loops.
So, go back to your blacked-out 3D model and render it again...with only ONE set of riders. Then close it, reopen it and render it again with only the NEXT set of riders visible...and continue until you’ve got the nine RIDERS.gifs you need.
NUMBER THE .gif FILES! ("RIDERS1," "RIDERS2," etc.) You’ll need them in the proper order later.
By the way, did you need to render multiple RIDE.gif files because your ride has multiple views? Then you’re in for MORE work. The same process will need to be repeated the same number of times with your Rider images. Ain’t RCT2 grand? <sigh>
Now, here’s a special consideration for Vehicle Based Rides or even Flat Rides where riders may overlap. The order in which the game renders the ride on screen is always this:
1) Image of the Ride empty
2) Image of the first Peep (or pair if they ride in pairs)
3) Image of the SECOND Peep (or pair if they ride in pairs)
4) Image of the THIRD Peep (or pair if....well, you get the idea)
For certain rides with high capacities, you may have seven or eight LAYERS of JUST Riders!
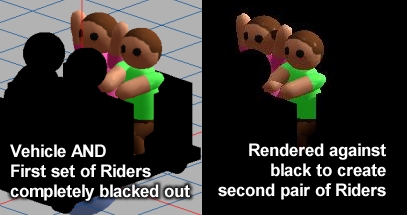
Because the second set of Riders is rendered AFTER the first, we need to eliminate the problem of them overlapping. That’s done in EXACTLY the same way as the ride/vehicle...we black out all the ride objects AND FIRST SET OF RIDERS so that they are invisible to the game, but block out (read that as, "automatically erase") portions of the Riders that might be behind them.
This means we’ll need to render a completely separate animated .gif...named "RIDERS2" or something like that. This is the reason that rides with a higher capacity of visible riders require at least double the number of Rider images....usually more than double.
It can happen on Flat Rides as well. My Swinger encountered this problem...which is how I learned about it.
I had to determine which Riders were rendered first -- It’s the first Rider or PAIR of Riders that get on the ride, by the way...the seats always fill up in the same order on Flat Rides. (Build your intended Base Ride in the game, let it operate and watch it closely to determine which seats load first, second and so on.) Then I had to erase all of the overlap accordingly, pixel-by-pixel. Ah, the "thrill" of discovery! I think I still have scars from that one.
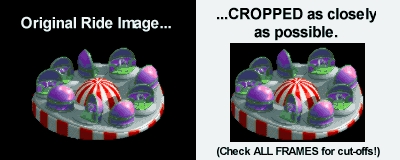
Now, speaking of the original ride’s pictures, remember that we said they were cropped as closely as possible? Well, currently, the ones we’ve made aren’t. THAT will need to change...somewhat, at least.
The easiest way to do that is with your Bitmap Editing program (specs and requirements described in the "TOOLS" section). I’ll be using Corel PhotoPAINT, but PaintShop Pro, PhotoShop, anything like that will work. Open RIDE.gif in your program and we’ll begin.
There’s a LOT of black space around the ride image that needs to be removed. BUT we don’t want to remove any part of the ride. Here’s how I do it:
Looking at the first frame of the animated .gif, I draw a rectangle on top of it...on a separate "layer" so that we don’t ruin the image. The rectangle should JUST cover the ride image, but NO MORE than that.
Then I step forward through the frames one at a time...looking for anything during the animation that sticks out beyond the rectangle I’ve drawn. If anything peeks out, I stretch or resize the rectangle to cover it. Continue through the entire animation frame-by-frame until you reach the final image.
Now, I crop the image to the boundaries of the rectangle...then delete the rectangle completely. This leaves me with an animated .gif file that’s cropped as closely as possible to my ride image WITHOUT cutting any of the ride off at any point.
Granted, the individual images could be cropped a bit more, but that would require a lot of messing about with the pos.txt file...which most people find to be confusing enough as it is. So, we’ll be sacrificing a few kilobytes for the sake of convenience.
Actually, if you’re doing a ride based on the Twist/Snow Cups, Dr J’s Editor will crop the images automatically and generate the adjusted pos.txt for you.
It IS possible to use Dr J’s Editor as a tool to do that for other ride types as well...I’ve done it. But you’ll be doing a LOT of renaming, adjusting and messing about that gets incredibly confusing. Here’s what I mean...
That process works like this. You import your final Ride images into Dr J’s Editor...one at a time. Then you import the Rider images...one at a time. Then you adjust/move the Rider Images so they’re in the proper positions...one at a time. Then you "Save Ride" and rip it apart using Buggy’s Editor.
After that, you’ll need to rename each new "pic***.bmp" file to fit your INTENDED base ride. Then copy ONLY the pos.txt entries you need out of the temporary ride’s pos.txt and put them in JUST the right place in your FINAL ride’s pos.txt file.
Confused? I know I am...but, do you see what I mean? Unless you’re going to save a HUGE amount (like MEGABYTES) on the file size, it’s really not worth the effort. Just keep them cropped closely and things will work out fine.
I’ve gotten off track here. Let’s return to the project at hand. We’ve cropped the RIDE.gif. NOW we need to do exactly the same thing to RIDERS.gif.
...and I DO mean EXACTLY!
This is where a more high-end program comes in handy once again. Use "Copy" to copy the FIRST image of RIDE.gif to your program’s clipboard. Open RIDERS.gif and look at the first frame.
Use "Paste" to put a copy of the cropped ride image ON TOP of your RIDERS.gif. Make it about 50% transparent so you can see through it to the Riders. You should have what looks like a ghost ride with ghostly riders.
Position the ride so that the riders are lined up in their appropriate seat(s). Then crop the WHOLE image to the edges of the ride image (like we did with the rectangle, earlier)...then delete the ride image. You should see your Riders revert back to their earthly form.
And guess what, they’re lined up PERFECTLY with the seats in RIDE.gif!
As discussed for the Ride images a moment ago, these Rider images could REALLY be cropped a bit more. The original ride’s pictures certainly are. But remember, THOSE all have different sizes, while OURS are all the same size. This means that our pos.txt file will be easier to put together.
Why? Since THEIR images all have different dimensions, their positions must be individually adjusted by the pos.txt file. (pos.txt = "position.txt"...get it?) Each line would contain the precise coordinates necessary to compensate for the size differential of every single image. For an elaborate Flat Ride or coaster, this could run into hundreds, sometimes THOUSANDS of lines! OUR pos.txt will simply be the same two numbers repeated over and over.
If you REALLY want to be as efficient as possible and spend DAYS on your pos.txt file to save those few kilobytes on the image files, be my guest. Me? I’ll be at the beach.
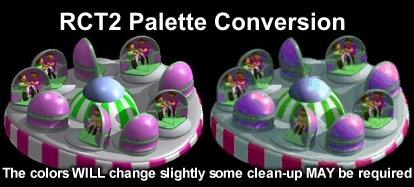
RCT2 uses a 256 color palette...a very SPECIFIC 8-bit set of shades and hues that is used for every object in the game...but if you count them , you’ll find that their "256 Colors" come up about ten short! The palette actually contains some colors that you never see in the game They’re used for transparency and special applications like making the water "sparkle." (Actually, RCT water doesn’t animate, but "cycle" through a set of specific shades of a particular color...the default being blue.)
Standard animated .gif images are limited to 256 colors...that’s why they’re a poor choice for photographs, which generally use thousands of colors. Problem is, they’re the WRONG 256 colors for RCT2. How do we correct this?
Dr J’s Object Editor will automatically convert the images for you when you import them. You’ll see the images on-screen and can use the editing tools alter them if there are problems. That’s fine if you’re using that program. But what if you’re not?
Well, Buggy’s final version of the RideMaker program is also supposed to convert images to the proper palette for RCT2. And no offense to Buggy, it can sometimes be unpredictable. Control freak that I am, I like to see EXACTLY what the colors will look like before I get them into the game. I hate surprises...especially when it means I have to go back and re-work images that I thought were finished.
So, here’s how I do it BEFORE reaching Buggy’s program.
Open your cropped RIDE.gif and RIDERS.gif in your Bitmap Editing program. We’ll need to convert their colors to the proper RCT2 palette.
Um...where to we get the palette from? From ANY RCT2 screenshot .bmp.
Open a screenshot in your Bitmap Editor and using the program’s color capabilities, extract and save the palette file...called a ".cpl" file in Corel and ".pal" file in others. Be sure to save it somewhere you can FIND it easily. Most programs tend to save it in some obscure place in it’s own settings. That can be tough to find later. I’d suggest putting it inside your "RideFolder" for easy reference.
If you can’t figure out how to do that in your particular program, consult the Help file. They all do it different ways...and other than Corel, I wouldn’t have a CLUE where to tell you to start looking.
You can close the screenshot now if you want to...we’ve got what we need from it anyway.
Now we need to convert the palette of the .gif files. To do this, we need to change the "Color Mode" to 256-colors...which means 8-bit paletted. Tell that to the program AND that you want to use a CUSTOM color palette to do it. You should now have the option to open your RCT2 Palette...the one we saved earlier...and convert it.
When you do, you’ll see that some (perhaps ALL) of the colors will alter to varying degrees. The pinks may become a bit more lavender. The blues a shade more green. Some spots may get a strange texture...stuff like that. What’s happened is that the program looked at each color in your image, found the one in the RCT2 Palette that it was closest to and changed it...hopefully not TOO drastically or you’ll have to do some pixel-pushing to fix it.
Zooming in on your newly-converted image so that it fills the entire screen, you can easily step through the .gif frame-by-frame (paying close attention to the pink and green "paintable" sections) to make sure that there are no errant pixels or odd color changes that will cause problems down the road.
Once you’re happy with your RIDE.gif, save it and close it...we’re finished with it anyway.
Now we’ll turn our attention to the RIDERS.gif. and apply exactly the same process to it.
When you zoom in after conversion, you’ll see the LACK of details that we discussed before. The highly pixelated Rider images aren’t exactly "high art," but they’re necessary for the game.
Again, pay close attention to the colors of the pink and green shirts on the Riders. They’ll be recolored by the game later on, so the colors need to remain in either the green or pink/purple range. If parts of the pink turned a weird orange, or portions of the green turned blue, you’ll need to correct it. MORE Pixel-pushing! (Oh, joy!)
Make a note of what problems you have with these two shades...and use that info to alter the pinks and greens on your 3D Peep model to (hopefully) eliminate this pixel-pushing next time.
If you have more than one set of RIDERS.gif...and you may, depending on the capacity of your ride/vehicle...repeat the above process for each of them. SAVE EACH ONE when you’re finished.
All right, we’ve got cropped and color-corrected, animated .gif images containing every animation frame necessary for your ride...but that’s not QUITE what we need, is it? We need bitmaps, not a .gif.
In the "TOOLS" section under "EXTRA HANDY TOOLS", I recommended downloading a program called "IrfanView Image Viewer." Now you’ll see why it’s so "handy."
Fire up IrfanView and open your RIDE.gif. It’s probably animating right there on the screen. When you’ve finished admiring your handiwork, brace yourself...we’re about to rip your hard work into tiny pieces.
Before we do that though, you may notice that IrfanView is capable of changing color palettes.
Why did we have to use that high-end bitmap editor if THIS one would do it?! While IrfanView CAN change color palettes, it’s not very good at it. It gives nowhere near the control and precision we need for these projects.
IrfanView also can crop images...but again, not with the control we require.
But what it DOES do EXTREMELY well is break apart .gif images into individual .bmp files WITHOUT changing their color palette.
Once you see your animated RIDE.gif moving on the screen, we’re ready to rip and tear. In the "Options" menu, click on "Extract all frames..." The program will then ask where you want to put them. Select your desired destination and click "OK."
When you open that destination folder, you’ll see something pretty cool -- dozens of little bitmap images named RIDE_frame_***.bmp...and numbered sequentially! Pretty darned NEAT!
Repeat the same process for the RIDERS.gif(s), putting them into the same folder if you like. They’ll automatically be named "RIDERS_frame-***.bmp" so they won’t over-write the ones for the ride.
If you’re using Dr J’s ObjectEditor, you need go no further with it. This is EXACTLY what we WANT!
But if you’re using Buggy’s RideMaker then it’s, um...ALMOST what we want. The names have to be changed.
Now, you COULD go in and change every file’s name from "RIDE_frame_000.bmp" to "pic003.bmp"...one at a time. Lord knows I‘ve done that a LOT. It can take HOURS for a complex ride. But I’m about to show you how to do it in about a minute.
While you’re still in IrfanView, click "File," then "Batch conversion/rename..." Go the folder that contains your new .bmp files...although IrfanView is probably already there...and highlight the images you need. You can highlight ALL of the necessary ride bitmaps -- both RIDES and RIDERS. We’ll have a chance to sort them out in a minute.
Once they’re all highlighted, click the "Add" button and they’ll all magically appear in the window on the left of the screen. BEFORE YOU DO ANYTHING ELSE, scroll through the list and VISUALLY MAKE SURE that they’re all in the correct order. Sometimes the LAST image gets put at the top of the list. A simple way of doing this is to click the "Sort files" button and sort them "By name (ascending)." If you’ve named the original .gif files RIDE and RIDERS, the program will automatically sort the RIDE images to the top of the list...where you want them anyway.
Although this is a whiz-bang shortcut, scroll through the list and VISUALLY CHECK THEM ANYWAY! Just one file out of place can really cause problems later on.
Okay...almost ready to rename them. But first, you have to tell the program HOW to rename them. in the "Work as:" box, select the radio button marked "Batch rename." Now, in the box marked "Name pattern", type "pic###" without the quotes, of course. This will be the filename of the output files -- the ### being replaced with a particular series of numbers...which we’re about to specify.
Click the "Set rename options" button. You’ll see the Name Pattern we specified a moment ago. Below it is a box marked "Starting index." This is the number that will replace the ### symbols in the FIRST file’s name.
Since Ride images start at pic003 in your Ride (in ALL editable Rides, really), 3 will be our starting index...so, type 3 in that box.
"Increment" should be set by default at 1...which for our purposes is usually fine.
REALLY IMPORTANT NOTE!!!!!!!!!: If your ride has more than one view...a left/right or all four views...simply sorting them by name will NOT put them in the order you want.
Look carefully at your original Base Ride’s images. If they alternate left view/right view, YOUR images will need to also. If they show FOUR views of the ride, NE, SE, NW, SW, before moving to the next frame of animation, YOURS will need to be in that order also.
If you have two views, select ONLY the Ride/Rider images for that view and name the others separately. This allows you to select "2" as the "Increment" value. The second time through you would select the OTHER images and rename them the same way, using 4 as your "Starting Index" instead of 3.
If you have FOUR views, follow the same procedure, selecting each view’s images separately and changing the "Starting index" and "Increment" values accordingly each time.
One more thing...There is a box toward the bottom of this dialogue box that asks how you want your files to be handled. This is a personal preference, so I’ll let you set it yourself. Read ALL the warnings, though! Take them seriously! When in doubt, play it safe.
Click the "OK" button.
There’s one more thing we still need to set; WHERE do you want the new files to go? Click the "Browse" button and choose a folder to put the images into.
That’s it! We’re ready to Start...by clicking the "Start" button.
If your world hasn’t caved in, you SHOULD now have a bunch of files someplace...all named "pic003.bmp" through "picwhatever.bmp"...which is ANOTHER step in the right direction!
Okay. At this point, we can close IrfanView. Thank it SO much for it’s help (I used to do all this stuff BY HAND when I started making rides...IMAGINE THAT!) and put the program to sleep.
One more test before we declare this a victory. Remember the little Select-all-the-images-and-right-click-to-view-them-in-a-slideshow Trick we used when examining the original ride images? Highlight all the new pictures and do it. If we’ve done this everything correctly, it should look exactly like your animated .gif did.
If it does, SHOUT EUREKA FROM THE ROOFTOPS!!! I’m serious! We’re not home yet...but it’s definitely on the horizon.
At this point, take five...or take ten...or take a cruise. Point is, you’ve gone a LONG way toward making your Ride become an RCT2 reality. Get some rest and I’ll see you in the next chapter.