|
Chapter
Nine ~ Flat Ride Testing
~ Tracked Ride & Coaster Testing
~ |
Here we go...the exciting part (in theory, anyway). Testing CAN be a difficult process. But I know you’re probably REALLY excited right now, so we’ll waste no more time. Install your new creation by placing a copy of the new .dat file into the objData folder of your RCT2 installation...the same place we got the .dat for your Base Ride.
Now fire up RCT2. You’ll see the game looking for your newly installed ride, checking the file and then the game will begin. The first place you need to head for is the Scenario Editor.
I suggest making a small Park...100 x 100, selecting only the standard rides and saving it as a landscape called "Ride Test Park." That way you won’t need to go through setting up an empty scenario from scratch every time you want to test a ride.
Scrolling down through the Ride Selection List, you should see your ride listed alphabetically. If you used Dr J’s Object Editor, the first frame of your Ride’s animation should appear on the right when you select your new ride. If you want to make a funky fresh preview image, you’ll need to do that in Buggy’s program. Just follow the instructions when we get to that in Chapter 10.
If using Buggy’s RideMaker, the preview image that appears on the right will be that of the old Base Ride. We’ve not made yours yet...but we will.
Once you have your ride selected, go through all the usual steps for creating a new scenario.
HINT: If you’re building a Gentle Ride, set it so that Guests prefer Gentle Rides...it’ll load your ride up faster when you test it. If yours is set as a Thrill Ride...well...then...you know.
Once you’ve saved your new test scenario, open it in the game...the moment of truth is upon us. Open the Ride Selector window and see if your ride is there.
It IS?! HALLELUJAH!!!
Well, BUILD that puppy and have a look at it.
Now let's see what's wrong with it....
Okay. Is it centered on the pad? If so, GREAT! If not, THAT will need to be adjusted in the pos.txt file (or Dr J’s Editor, if you used that). Take a screenshot for later reference
Is it ALL there? Way back in Chapter 2 we discussed Clearances. If you’ve exceeded the clearances, then parts of the thing will simply be chopped off at the edges. Buggy and Dr J have both already made the clearances as large as possible, so if you’re STILL getting cut off, nothing can be done about it. You have my sympathies.
Does it animate properly? It should look JUST like your animated RIDE.gif. If not, you may have some frames out of order.
Is the speed right for the ride? Speed CAN be slightly adjusted as we discussed before, but not much.
If your ride has multiple views, does it rotate properly with the map? Place a tree on one side of the ride and rotate the map. Is the same side of the ride always toward the tree? If not, you may have your views in the wrong order.
If your ride has hardcoded elements -- support structures, etc. -- are they properly aligned? Chances are, they’re not. Take a screenshot in each view for later reference.
Look closely at the different views. Some rides (the Twist/Snow Cups for example) do NOT stop on the same frame in all views. Is the ride stopping to load with your cars in the wrong position? Nothing can be done about it, but at least you know that the Base Ride may need to be changed.
We’ve checked the mechanics...now we’ll look at aesthetics. Does it look to be the right size compared to other rides? Is the LIGHTING CORRECT?! (Always been a pet peeve of mine.)
Paint it a couple of times. Do the colors look right? If not, your colors may need to be adjusted next time on your model. Are there pixels that SHOULD be colored but AREN’T? That’s going to have to be fixed either on the 3D model, or one frame/bitmap at a time. Or if you’re lucky, you MAY be able to select more colors in Buggy’s RideMaker to compensate.
One final thing...does your ride just plain LOOK like it BELONGS in the game? If not, what could be changed to make it seem more like the others.
Gee...all that and we haven’t even put riders on it yet! Open the ride and let some guests get on it.
Do they look like they’re sitting in the seats? Do they need adjusted at all? Their positions MAY be fixable in the pos.txt.
Are their shirts changing color properly? Slight variations won’t be a problem...SLIGHT ones. To correct that, you’ll need to adjust the colors on your 3D Rider model. A more intense pink or green makes the shirts appear darker. Less intense pink or green makes them appear lighter. Adjust either the color or the lighting before rendering the 3D model again..
How about the skin colors of the riders? Too yellow? Too red? Too dark or light? Is there a noticeable difference when they get on the ride? Do they suddenly look like they’re from another race? Another country? Another PLANET? That will need to be fixed on your model.
Do the Riders overlap in odd ways? Remember we discussed that in Chapter 7 under "Rider Overlap." Perhaps you imagined the loading in the wrong order. Study the sequence closely, take notes and try it again.
Tracked Rides are a bit more difficult to test...but it can be even MORE important. DON’T RUSH!
Naturally you’ll have to build a track. You’ll need to create one that includes EVERY POSSIBLE VARIATION of track that is available for your Base Ride...every angle of hill, drop, curve radius, diagonal, loop, corkscrew, helix and banked curve. If your vehicle may be called upon to go through "doors" or other pieces of scenery. place a few of those as well.
The track doesn’t have to be exciting. Actually, it’s easier to spot problems if the track is rather "slow."
When you first take your Tracked Ride for a test run, pause the game and look at the vehicles in the loading area. They will give you your first clue about placement. Do they appear crammed together on the track? If so, your vehicle may be a bit too long and the 3D model may need to be redesigned. Since their spacing is hardcoded, we must flex our design to match what the game can use. (And you thought we were DONE being flexible!)
You may notice some "jumping" or "twitching" when the cars are in the loading area. That’s probably not your fault. The ORIGINAL RIDES in RCT2 have that problem occasionally, too. You may never have noticed it before because...well...you were never LOOKING for it before. It’s just the nature of the beast...don’t sweat it.
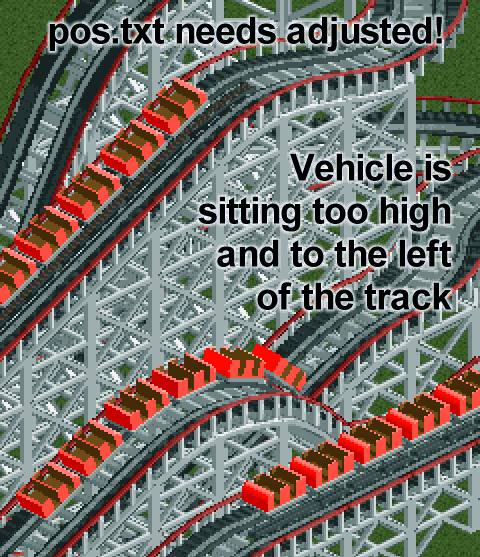
Un-pause the game and let the first car begin it’s trip around the track. Then pause it again. Does it appear to be sitting ON the track or is it off slightly? (It’s probably a bit off at this point. Don’t feel badly...mine usually were the first time around, too.) Snap a screenshot for future reference and we’ll alter the pos.txt later.
Watch it carefully around the curves for the same problem. Any time you see something that’s not quite on the track, snap a screenshot for later.
Do the cars bank the right direction? How about the angle on corkscrews and banked hills? Some of these alignment problems can be caused by the model being longer than the original. The angle MAY actually be fine, but the car sticks out further, making it LOOK "off." Your model design may need to be changed.
Now rotate the map and watch the car travel the track again from that angle. Problems can hide ANYWHERE! Snap screenshots of them for later study.
Try painting the cars. All the instructions in the Flat Ride Testing section apply.
Time to test the Riders. Open that coaster and see if the Riders work properly. Again, consult the previous Flat Ride section for details.
If you’re doing a "Train" type ride -- a coaster or transport ride with multiple cars -- you may discover that the vehicles appear to be too close together or too far apart. You’ll see this on some (MANY?) of the original RCT: Wacky Worlds and Time Twister rides. The distance between each car in the train is hardcoded into the Base Ride and cannot be changed. The only way to compensate is to alter the length of your vehicles in the original model.
During certain points you MAY notice that nearby objects, supports, etc. will "flash" or "strobe" as your vehicle passes close to them. This happens with many ORIGINAL RCT2 Rides to a greater or lesser degree. Again, you may not have noticed before because you weren’t really looking for it.
In our case, I once theorized that the flashing may be aggravated by the additional "black space" around our Ride Images. Although to test that, I’ve cropped every image as closely as the game does and altered EVERY LINE of the pos.txt to compensate. The problem STILL persisted. I don’t believe anything can really be done about it.
You may notice that this flashing becomes more pronounced when using "doors" or other scenery that the car actually passes through. It happens sometimes with the originals too.
Oh well...
I’ve never taken FULL responsibility for the success of my RCT2 Ride Projects. Buggy and Dr J created the programs that make them possible. Countless others have offered suggestions along the way regarding the look and movement of the models...and I thank them all.
The problem with testing a ride is that you are often "too close" to your project to see the imperfections. You WANT it to be perfect. Magicians (the OTHER world I dwell in) call this the "Blink Syndrome;" practicing sleight of hand in front of a mirror and "blinking" at a crucial moment...so as not to see where you’re messing up. It looks fine to you, because you blinked...but your audience may not.
My suggestion is to find someone, a friend whose opinion you respect. Someone who’ll take the time to look over your project and NOT BE AFRAID to pick out the little flaws that YOU may have missed.
Then, LISTEN TO THEM AND FIX IT!
Unknown by most, I have had a special SECRET WEAPON in my arsenal that has been INVALUABLE to me when it comes to testing. That weapon is "Mama Bear" from RCT Fun (www.rct-fun.com). I wouldn’t release a ride without her! But don’t ask her to test YOUR Rides...she’s MINE!
That woman simply LOVES RCT, has amazing creativity, LOTS of patience and eyes like an eagle. She’s seen almost every one of my rides LONG before they were released to the general public and tested each of them thoroughly, offering her feedback on the movements, coloring, operations...and nagged me about EVERY SINGLE PIXEL that I had out of place. I think of her as my "Quality Control." If there was ONE FRAME where a Rider’s eye disappeared, she’d spot it and let me know.
When writing this chapter, I asked her for her advice on testing. She graciously took the time to offer her own Testing Secrets for making sure everything is working and is the best it can possibly be.
How to Test Like a BEAR!
In case of non-tracked rides, I build 2 or 4(depending on the kind of ride) of them each shown from a different angle with the entrance/exit in a place where they do not block the view on the ride.
I test them in two or three different color combinations, since some colors do "hide" bugs where others show them clearly.(and also to see if the ride recolors right, of course) Painting them black or white will really make unpainted pixels stand out.
First I have them run empty and concentrate first on the overall look and then on details, like cars, the platform, and moving parts of the ride.Do I see "uncertain" movements, "flickers" and such? When I do, or think I do, I make a series of screenshots, trying to capture as many "ride moments"(using the pause button) as possible and then study the screenshots (magnified x 2 or 3) to see if I can locate the problem. (often stray pixels, or wrong shades or so).
Then I open the park and let the peeps in and repeat the same procedure with peeps on the ride.
I also keep an eye on how peeps enter/leave the ride.
With tracked rides I build a simple layout that does have all the different elements in it in a way that each element can be viewed well (a "wide" and not too fast layout).
Then I make sure I can have the max amount of cars/trains and let it run (empty first) and study it from all 4 angles for the same things as mentioned above)
If I detect something I start making screenshots again and study them. I repeat that with at least one other color combination.
Then I let the peeps in.............etc.
Then I send AE the selection of screenshots that show "the problems" and descriptions of when they happen....
Was that "picky" enough? LOL But serious, this IS how I do/did it......I must admit I often get carried away and not only place the ride that needs testing but lots of your other rides too. Just for the fun of seeing them together.......LOL
There you have it -- the testing secrets of a REAL Task Master...er, Task Mistress. (Task Person?) Any way you say it, she truly kept me on my toes and constantly challenged me to make my rides as close to perfect as they could possibly be. I hope her suggestions here will do the same for you.
So, the ride needs adjusted. Not that big a deal. We’ll tackle the main issues one at a time.
COLORING - Paintable Area Problems
If the paintable sections are not working properly, it may be fixed by simply selecting more (or different) Color Changes in Buggy’s Editor. If you were using Dr J’s Editor, try masking various colors and altering them appropriately.
If the problem is with the Riders -- shirts, skin tones, etc. -- these problems may be fixed in your Bitmap Editor or Dr J’s Editor (if you were using that initially). Either way, its a slow process that is done one image at a time. Try using masks (if available in your program) to speed up the process.
Alternatively, you could go back to your original model, change the colors or lighting to gain the desired effect and then re-render the images. This may seem like going back to the beginning (which you almost WOULD be), but it may actually be easier and faster than pixel-pushing one image at a time.
POSITIONING
If using Dr J’s Object Editor, you know how to move things around...we did that in Chapter 8. The same thing applies here. Use the screenshots you took as a reference and adjust things accordingly.
If using Buggy’s Editor, changing the pos.txt entries is the way to go. Open your screenshots in a Bitmap Editor and zoom WAY in. Figure how many pixels off the ride images are and alter the pos.txt entries accordingly.
NOTE: If you need to change ALL of the entries, use Windows Notepad’s "Replace" function to speed the process...i.e., find all instances of "-22" and change them to "-24."
ANIMATION GLITCHES
If you seem to have animation frames that are out of order, that’s probably EXACTLY what happened. It’s an easy mistake to make and relatively easy to fix. In Dr J’s Editor, simply re-insert the proper images in the right order...using the "Movie Camera" button to view the sequence and verify that they’re correct.
If you’re using Buggy’s Editor, use the "Slideshow" trick to view the images in the folder and see which ones are out of whack. Simply renaming the proper files should do it. If they don’t point the same direction as the ORIGINAL images on the Base Ride, there’s your problem.
No matter which Editor you’re using, you’ll need to re-build the ride...simply saving/overwriting in Dr J’s program or clicking "Build" in Buggy’s. Replace the old file in your RCT2 objData folder with the newly created (and hopefully FIXED) one and go through the testing process again.
Some rides I’ve made required only a few tests before they were acceptable. Others took WEEKS to get right. No matter how tempting it might seem, DON’T RUSH THIS PROCESS! Once you proclaim a ride "complete" and allow others to use it in their Parks, that’s it. there AIN’T no going back, Bro’.
You see, if you alter a SINGLE PIXEL of the ride and re-release it, it will over-write the old one in people’s computers, rendering any existing parks that use your old version completely unusable. RCT2 will just curl up into a ball and whine. Your end users will NOT thank you for it!
Testing may involve going back to the editor and re-building the file dozens of times.
Once you’re happy with your file, send it to your testers and give them a chance to kick the tires. If they find weaknesses, BE OPEN TO THEIR SUGGESTIONS! Then fix them accordingly. Once EVERYONE is happy, thrilled and delighted with your new creation, you’re ALMOST done!
Additional Troubleshooting Tools
To aid in figuring out two of the more complex RCT2 Rides, I have made two files available:
AE-NMBR1 - This is a Looping Coaster Ride Vehicle...just like the original in RCT2. However all of the vehicle images have been replaced with paintable numbers. With this tool, you will be able to build Looping Coaster in the game, run it in testing mode and SEE which image is displayed at any point on the track. Since they're all rather similar, it can be used to troubleshoot problems with ANY coaster train. It is installed and used just like any other Custom Ride. Click HERE to download the .zip file.
AE-NMBR2 - An RCT2 Carousel Ride, however the Ride frames are numbered and the rider images have been replaced with numbers as well. The loading and display sequence can be difficult to understand. It is installed and used just like any other Custom RCT2 Ride. Click HERE to download the .zip file.