|
Chapter
Ten ~ Creating the Preview
Image ~ Readme.txt ~ |
Here we add the finishing touches that make your ride complete. One of these steps is to make the Ride Preview Image...the one that will appear both in the preview pane of the Ride Selection List in the Scenario Editor and in the Ride Selection Window during the game.
Start RCT2, create the scenario and build your ride as usual. THIS time, you’ll go all out...adding scenery, greenery and all the tiny touches that make the ride area complete.
Open the Ride to the park guests and let them board the ride...the preview looks better with Riders in it. Wait until you see the PERFECT position of the riders on a FULL ride. If doing a Tracked Ride, try to have a couple of segments of track close together and get as many vehicles as close together in the shot as possible.
When you see the perfect image, pause the game and snap a screenshot...maybe a couple so you have options later. Now you can exit the game.
If you have been using Dr J’s Object Editor, then you’ll need to finally dip your toe into Buggy’s RideMaker and use it to rip your .dat file apart. See the instructions under "How These Things Work" in Chapter 2.
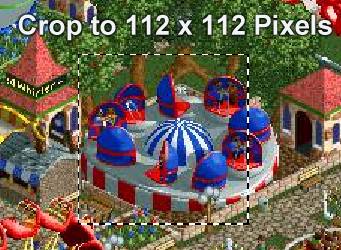
Open your Bitmap Editing program, open your screenshot AND the ride’s pic000.bmp...the ride’s original 112 x 112 pixel preview image.
If your Bitmap Editor allows it, drag pic000.bmp on top of your screenshot and make it about 50% transparent so you can see what’s under it. Drag it around until it’s edges frame an exciting and attractive view of your flat ride or ride vehicles. Then crop your screenshot to that size and location and delete the semi-transparent image...it was just a guide anyway.
If your Bitmap Editor DOESN’T allow that, you’ll need to manually center the image and crop it to EXACTLY 112 x 112 pixels. (See? I told you a more advanced Bitmap Editor would come in handy.)
What you see is exactly what your new ride’s preview image will look like. If you’re not happy with it, just try it again. But, make ABSOLUTELY CERTAIN that the image is EXACTLY 112 x 112 pixels...otherwise the game will ignore it and you’ll be kicking yourself later.
At this point you should also convert the image to the 256-color RCT2 Palette. We did that before in Chapter 7 under "Color Me RCT", so you should understand how that works. If it’s NOT changed to THAT color palette, you’ll get some VERY weird (and potentially sad) colors in your preview image.
What about the little feathered edges that appear in the Ride Selection Window in the game? How do we do those? We don’t. The game adds that edge automatically during game-play. FINALLY, something that RCT2 does without having to be held at gun-point!
When you’re happy with the preview image, save it as pic000.bmp...REPLACING the old one in your ride’s folder.
Now we re-build the ride -- for what is HOPEFULLY the LAST TIME!
Even if you’ve been using Dr J’s Object Editor, THIS must be done in Buggy’s RideMaker. There’s no way around it. Follow the instructions in Chapter 8: Construction under "Buggy’s RideMaker" if you’ve not used it before.
THIS is the time to go all out with your ride’s Name String and Description. Whatever you want the RCT public to see when they use your ride, THIS is the time to type it in.
Okay...push the magic "Build" button, click your heels three times and say "There’s no place like RCT...There’s no place like RCT..."
What is HOPEFULLY your final FINISHED RIDE FILE is sitting there in it’s .dat form, waiting to be discovered. As a final test, install it as usual and open the game to check it out in the Scenario Editor.
Is the preview image there? If not, you may have saved it in the wrong place or at the wrong size...112 x 112 is the magic number. It's name MUST be "pic000.bmp"
Are the colors correct? If not, you didn’t change the palette for RCT2.
If it pops up, stands tall and looks fine, create your test scenario and open it in the game itself. Does your preview image appear in the Ride Selector Window? Complete with the little scalloped edges and everything? (We worked hard on those.)
Guess what, you’ve just earned the official title of RIDEMAKER! Congratulations! Hooray! Cue the band! Drop the balloons! Pop the (cheap) Champagne!
Now all that’s needed is to write a "readme.txt" file that describes the ride, gives newcomers instructions for installing it and possibly mentions your website (if you have one) so that folks can come and download MORE of your amazing Ride creations (if there ARE any).
Place your ride’s .dat file and the readme.txt file into a zipped (compressed) folder...WinZip seems to be the RCT Community standard, so go to WinZip.com and download the latest version if you don’t already have it.
Now you’re ready to unleash it upon an unwary RCT world. Hit a few RCT community forums and offer it for download. See what people think of it. Bask in the praises of your adoring public.
Be aware that folks may also offer criticism. You can’t please everyone.
Some have no idea what you’ve gone through to make this thing actually happen...the blood, sweat and tears (not to mention TIME) that it took to bring this thing into being. Some may have valid points. Some will try to belittle your efforts simply on their own behalf...attempting to take you down a peg. Some will offer constructive ideas that could indeed make your next creation better.
Take their suggestions for what they’re worth, balance them with your own vision and ideals and you can only improve.
You’ve just completed your ride. Again, congratulations. I’ve just completed something, too...this Tutorial. It’s been a HUGE undertaking and I’m sure that I’ve made mistakes along the way. I’ll attempt to correct them as needed...as I find time...and as they become apparent.
This Tutorial is intended to be my "legacy" to the RCT2 Community...my biggest project so far...AND my last. After having literally spent years of my life devoted to these strange little RCT projects, I believe it’s time for me to personally move on.
I leave the information presented here in appreciation of all that the RCT Community has given me over the years and as a reference and inspiration (I hope) to future Makers of RCT2 Rides. This information will be archived at the RCT Space Network, my RCT home-away-from-home on the web, where it will be freely available to everyone who is interested for as long as the website exists.
If you have comments (NOT questions) about this Tutorial, please feel free to contact me through the links provided in the RCT Space Forums. I may not find the time to reply personally, but any and all comments are appreciated.
If you have problems with creating your rides, I will NOT be offering "Technical Support." Everything I know about the RideMaking process is included in this volume. Run a search. Read a little. Chances are, it’s here. Use a little logic and see if you can figure it out yourself! If necessary, post a question in the RCT Space Forums. If I'm not around and don’t respond to it there personally, I’m sure someone else will.
Again, I thank you for taking the time to explore this Tutorial. It’s been a rather sizable labor of love.
Best of luck...and may YOU make your OWN RCT wishes come true.
May 20, 2006